

The QuickBooks chart of accounts is a compilation of accounts that may be used to categorize assets, account receivables, debts, and revenue. In simple terms, it is a statement of the company’s holdings and accounts. By providing a full-proof financial report, the organization assists in understanding how much money it has, how much it owns, how much it owes, and so on. The chart of accounts QuickBooks reveals information about your company’s operations.
In this article, we will go through a brief overview of the accounts chart in QBs, its types, and how to use it. We will also discuss some tips and tricks of structuring and how we access the charts.
Table of Contents
Brief Overview- QuickBooks Chart of Accounts
The QuickBooks accounts chart is essentially a collection of account numbers and names that are essential to the business.
In general, a sample chart of accounts QuickBooks is often divided into four categories, which are as follows:
- Accounts of Assets
- Liability Accounts
- Accounts of Earnings
- Expense Accounts
Read more: What is the QuickBooks connection Diagnostic tool?
These were the four main categories, and the line items inside each category will identify the unique accounts. Each line item indicates a different account in each category. A few of the charts of accounts may also include the equity accounts, which are a depiction of what remains after accounting for all operational expenditures and revenue accounts.
QuickBooks Chart of Accounts – Various Types
The four types of QuickBooks charts of accounts are as follows:
-
Accounts of Assets
Asset accounts include anything that has monetary worth, such as a building, cars, land, inventories, collectibles, and others. As a result, this form of COA aids in monitoring how much you spent on a property as well as other elements such as depreciation.
Moreover, items in liquid forms, such as cheques and bank accounts, are also represented in this COA.
Asset accounts also include liquid assets such as checking accounts and other bank accounts. Accounts receivable and notes receivable are examples of other asset accounts.
-
Liability Accounts:
Mortgages, payroll taxes, promissory notes, credit card balances, bank loans, personal loans, and income tax payables are all part of Liability Accounts.
Remember that when you add a loan to this account, make sure you also include the loan amount.
You must just record the principal amount and disregard the interest owing. When a person makes a monthly payment and enters it into the accounting system, the payment is evenly split between an amount deducted from what is owing and an amount of interest paid, which goes into an expenditure account.
-
Accounts of Earnings or Income Accounts:
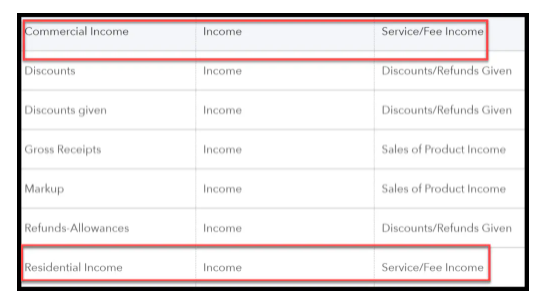
Costs, revenues, additional incomes or expenses, and cost of sales are the most common items in Income Accounts. Some accounts are the same for all firms, while others are exclusive to a certain company type. Few types of income are simple and convenient to develop, whilst others require time, money, and effort.
It is advisable to create distinct line items in the QuickBooks chart of accounts template for different forms of revenue.
-
Account of Expenses:
The expense account maintains track of the total amount of money you’ve spent. In reality, it helps you to keep a record of the money that isn’t with you. It is generally recommended to segregate your spending into distinct accounts, and you even have the option to establish sub-categories for your expenses.
Also Read: How to Make a Journal Entry in QuickBooks
Tips for Structuring the QuickBooks Chart of Accounts
Before you proceed with the process to organize the chart of accounts QuickBooks, consider the following tips:
- Many accounting systems include a COA. Preset account lines have numeric headers such as 1430.2 and 530.8. These figures can be useful for large corporations, but they are frequently a waste of time for entrepreneurs and small businesses.
- In the beginning, keep the line items minimal. Also, make sure that the line items have titles that make sense to both the accountant and you. It is advisable to use simple titles.
- Another thing to keep in mind is to avoid generating a new line item for each transaction since this would clutter the entire COA. Instead, you should take advantage of the subheadings in the accounting program.
How can you Gain Access to Your QuickBooks Chart of Accounts?
To gain access to your chart of accounts QuickBooks, follow the below steps:
On QuickBooks Desktop
- Begin by selecting the COA from any of the QuickBooks menus:
- Navigate to the Company and then to Lists or Accountant.
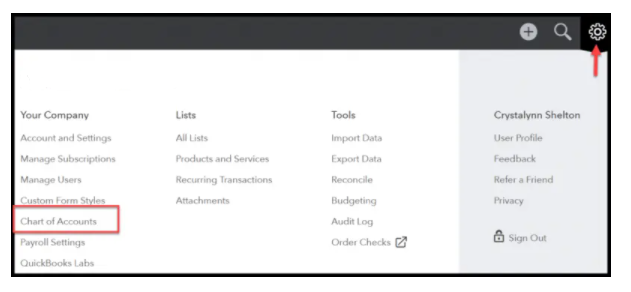
On QuickBooks Online
- In this case, click the Settings button and then choose COA.
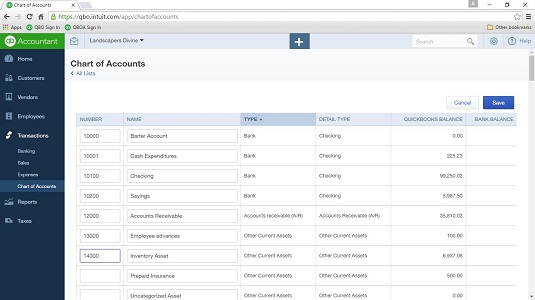
Simple Steps for Creating a Chart of Accounts in QuickBooks
The methods to set up the sample chart of accounts QuickBooks, that can aid your business’s health are as follows:
Step 1: Choose the lists- Charts of Accounts Command
- QuickBooks shows the Charts of Accounts window on the screen of your computer.
Step 2: Select the Accounts Button
- QuickBooks will display the Account Menu on your computer’s screen. When you click on the tab ‘Account menu option New,’ a new window will appear on your system’s screen.
Step 3: Add a New Account by Choosing Account and then New
- The Add New Account window will display on the screen by QuickBooks.
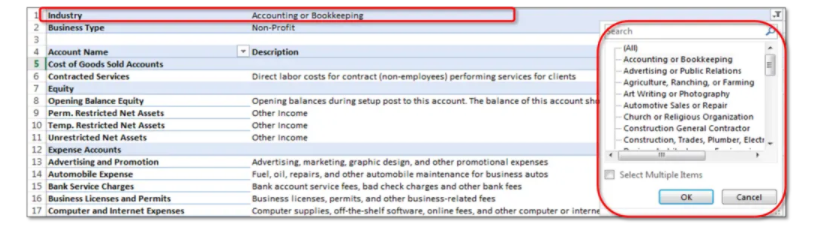
Step 4: Make use of the Account Type buttons
- QuickBooks accounts include Income, Credit Card, Loan, Accounts Payable, Fixed Asset, Balance Equity, Expenses, Other Income, Accounts Receivable, Costs of Good Sold, Long Term Liability, Other Assets & Expenses.
- Furthermore, Accounts will inform you of the place where your data is being reported.
Step 5: Hit Continue
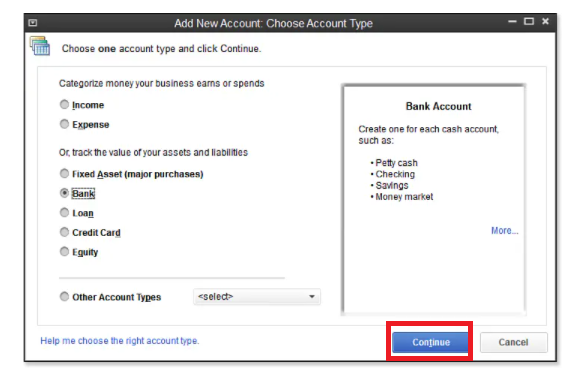
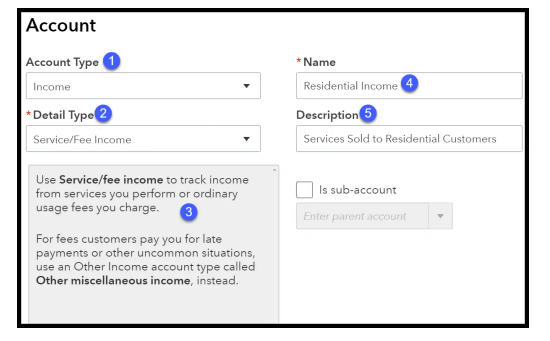
- QuickBooks will display the second Add Account box on your computer screen when you click Continue. It should be correctly noted that the account’s name will show in the financial statements. As a result, you must utilize the Account Name Box to give the new account a unique name.
Step 6: Examine the Sub-account
- After you’ve chosen the check box for the sub-account, you’ll need to give the Parent account a name.
Step 7: Bank Account
- If QuickBooks detects that you work in many currencies, it will urge you to search for all clients, bank accounts, vendors, and so on who use other currencies.
Step 8: The Account Description
- Actually, it is unnecessary to describe the new account. QuickBooks simply utilizes the account name in financial statements, thus no description is necessary.
Also Read: How to Record Loan in QuickBooks?
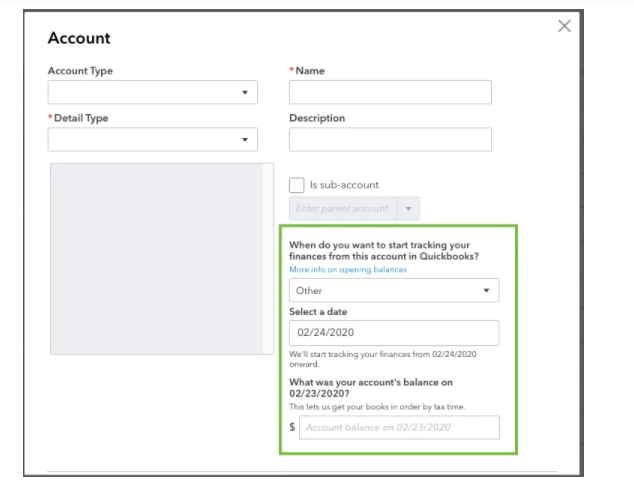
Step 9: Obtain Account Information
- The credit card account type version of the Add New Account window will aid in the storage of all card information.
Step 10: Acknowledge the Tax Line
- The cash account balances will be actually reflected on the corporation’s tax return. If you still wish to add a bank account, you may do so using the Tax-Line Mapping.
Step 11: Secure the New Account
- In the final step click on the Next tab to store the account details, and then the Add New Account window will appear.
- They will show on the COA list after the successful creation of both accounts.
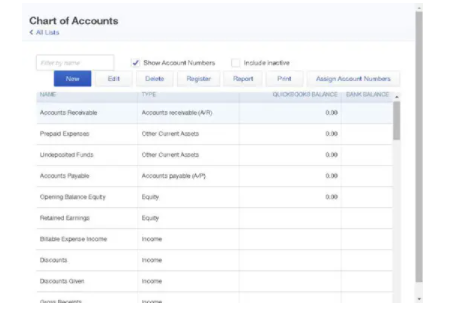
Steps to Add Account in the Lists of QuickBooks Chart of Accounts
Following are the steps that can help you to add an account to the list of COA.
- To start with, choose of chart of accounts by clicking on the icon of a gear.
- After that, Hit the new tab to gain account access.
- Either you must choose the save & close option or you have to choose to save & add for adding an account.
Steps to Delete an Account From List
There are the steps that we mentioned below if you want to delete some specific account from the list of COA. In this QuickBooks accounts chart, you don’t have to delete the account, you just have to inactive that specific account.
- For deleting the account, hit the option of view register.
- After that, you need to choose the option make inactive.
How can I Alter an Account on the Chart of Accounts?
The following steps show how to edit an account from the QuickBooks chart of accounts:
-
Choosing an Account:
In the first step select the account to be updated. You may change the accounts in QuickBooks at any moment. Scroll down to the account that has to be adjusted on the COA, then click the drop arrow next to Run Report, and then pick the Edit option.

-
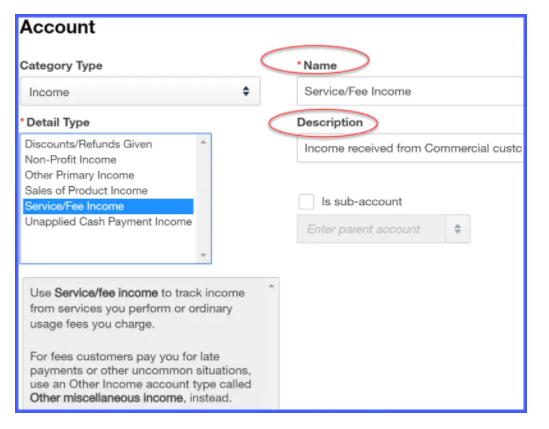
Making Alterations to the Account
You will then be sent to the window depicted below, where you may modify the Account Name and Account Description fields. The important thing to remember here is that you should not modify the category type if you have already entered transactions using the account. This can have a significant influence on the financial accounts.
-
Save and Close:
In case you don’t save the modifications before quitting the account, your effort will be completely lost.
Steps to View & Print the Chart of Accounts in QuickBooks
Following are the processes of viewing and printing COA in QBs. In this process, you must have knowledge about how to export charts of accounts in QuickBooks. To do this, you just follow the same process of importing but choose the option of export instead of import.
- To start with, hit Run Report, now you will see the copy of the COA on the screen.
- After that, you need to export the COA to Excel to take print it.
- You can also email this COA if you want.
How to Export a Chart of Accounts in QuickBooks?
One of the most useful features of QuickBooks is the ability to export your chart of accounts. This can be extremely helpful if you’re switching to QuickBooks from another accounting software, or if you simply want to back up your data.
Follow these steps to export your chart of accounts in QuickBooks:
- Open QuickBooks and go to the Lists menu.
- Select Chart of Accounts from the lists menu.
- Click the Export button at the top of the chart of accounts list.
- Choose a location to save your file and click Save.
- Open the exported file in Excel or another spreadsheet program.
Your chart of accounts will now be exported to a CSV file that you can open in Excel or another spreadsheet program.
Now that you’ve exported your chart of accounts, you can do whatever you want with the data. For example, you could use it to create a new chart of accounts in QuickBooks, or you could use it to import your data into another accounting software.
Wrapping Up!
All of the above procedures will assist you in recording your daily company activity, and you are now ready to set up the QuickBooks chart of accounts. However, if you become stuck while carrying out these duties, you can connect with the technical team for further assistance.