If you wish to exchange data with numerous users in the QuickBooks program. Then you must set up & install QBs multi-user mode. QuickBooks is widely recognized & is the best desktop software for business accounting available today. It’s extremely efficient and allows you to keep track of all of your accounting tasks in the most efficient way available. QuickBooks Multi-user mode allows numerous users on the same network to view and control the exact file.
Moreover, in case you are looking for information regarding, setting up a multi-user network on a QuickBooks desktop, then you are at the right place. We have provided you with all the basic knowledge users must know about QuickBooks and its multi-user mode.
Table of Contents
QuickBooks Multi-User Mode Networks: What is it?
While you can learn how to setup a multi-user network on a QuickBooks desktop, you must first grasp what the multi-user network is. In QuickBooks multi user mode, many people can work on the same corporate document at a given time.
This tool allows you to save a your precious time and make things simple. Multi-user mode may be quite advantageous if you have a large company with high employees. This should be highlighted, although, to setup a QuickBooks multi user mode, you must have a different copy of licensed software installed.
System Requirements for QuickBooks Multi-User Mode
- Another key step is to activate and check the QuickBooks database server management.
- By entering data in as administrator, in QuickBooks add the user you can check permissions of Window file.
- When converting to a multi-user network, it’s a good idea for setting up users for the company file.
Points to Remember in Setup
You can have a connection to data file from anywhere on the network using QuickBooks. The program must, however, be installed individually for each user. See how to add a user to QuickBooks. Varied accounts have different levels of access, such as:
- In QuickBooks Premier, the number of users is limited to five.
- The QB company solution allows up to thirty users to acquire the file simultaneously.
- In QuickBooks Pro, the number drops to a limit of three.
Also Read : Download & Use QuickBooks Connection Diagnostic Tool
Easy Methods on How to Set up Multi User in QuickBooks Desktop
You must change the QBs Desktop, Server, & Windows OS settings to complete the setup. The following are the methods on how to set up QuickBooks multi user:
Method 1: Go to QuickBooks Desktop and Set-Up
1.QuickBooks Desktop is available for Windows users to download.
- Locate a reputable site for download link.
- Thereafter, go ahead & download QBs Desktop.
- You need to Save your file within the Downloads folder, which is the default.
2. Over the server device, install QuickBooks Desktop.
- Go over to the QB Desktop installation file that you downloaded.
- The file may be found in Downloads folder.
- To open .exe file, double-click it.
- The installation type is then displayed.
- For install type, pick Custom & Network Install.
- Then choose the “I’ll be using QBs Desktop on this pc, & I’ll be storing”. In case you wish to install QuickBooks Desktop in its complete form on server machine.
- If you prefer the files to be hosted on the server computer, select that option. On this PC, I’ll not be using QBs Desktop on this pc.
Then, as directed on the display, follow the directions to set up and install a multi user network for QuickBooks desktop.
Method 2: Switch Hosting to Multi -User
- To use QuickBooks, you must first launch the program.
- Then, if necessary, update company file in QBs to latest version.
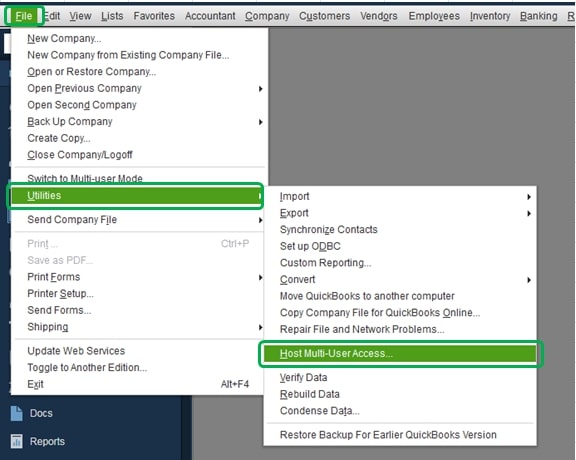
- Now, to navigate to file & choose the utility option, as well as the host multi-user access option.
- If the earlier hosted multi-user setup is still intact, you should proceed to the following step.
Method 3: Install Database Server Manager
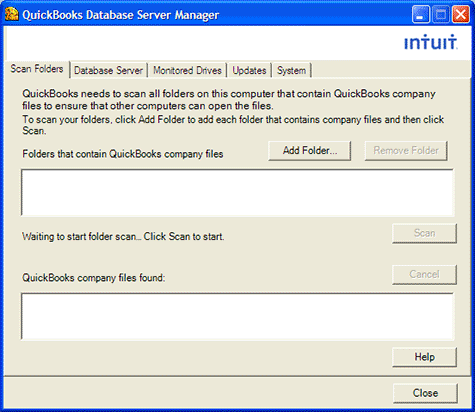
The QBs Database Server Manager facilitates the transfer of a company file from one device to another. As a result, when you download & install QuickBooks programs on your machine, this is also installed. By customizing it, you can ensure that it installed. The following are the steps to see if it’s working:
- In the Windows operating system. Go for the search bar in the Start Menu.
- Write Service in the space.
- From the results, tap on the Service & open it.
- Open QuickBooksDBXX in the Service by clicking on it.
- Select the tab of General from drop-down menu.
- Find the section of service status on this tab.
- If it’s already operating, select stop.
- Select the Automatic option from the starting type drop-down box.
- Hit Login. Select account of Local System.
- Using Recovery tab, select Reboot the Service.
- Select the General tab from menu option.
- Click to Start to the restart in your Database Server Manager.
Method 4: Configuring Firewall and Security
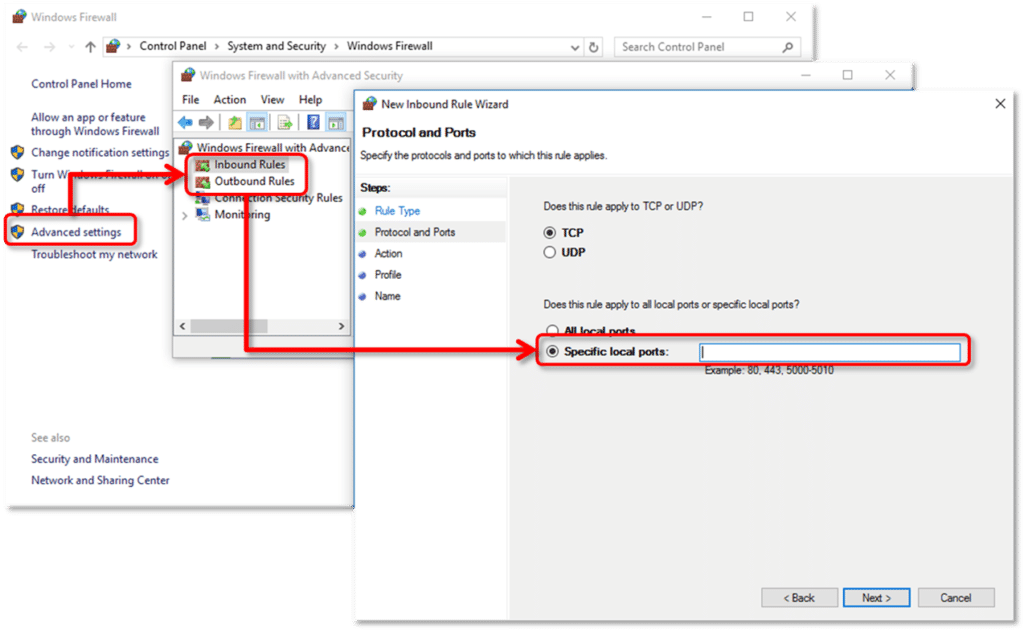
- Verify the firewall after opening the start menu.
- Then select Windows Firewall, and then select Advanced Settings.
- After that, tap on inbound rules & then select the option to create a new rule.
- Then, select Port & Next Options.
- After that, move towards TCP option & enter ports that QuickBooks requires for the current year.
- Permit the connection to be established.
- Then, after checking all of the profiles, move on to the next stage by picking next option.
- Give the rule a name and then click the Finish button.
- Finally, launch QBs in multi-user mode to complete the process.
Method 5: Access Permissions for Sharing the Files
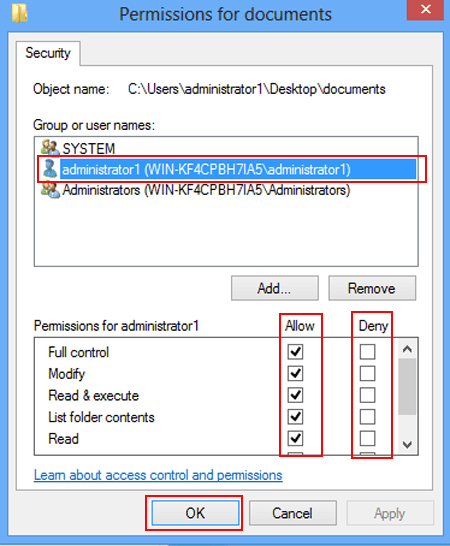
- Users must now right-click on folder containing the business file.
- After that, go for properties menu and choose the option of security. Also, select the choice to modify.
- Users must now right-click on folder containing the business file.
- You must also choose QBDataServicesUserXX, then choose Full control and press Allow.
- Go to apply and hit on OK.
- Finally, access permissions on setup windows to share your Company File.
Method 6: Set Windows Administrator Rights for Windows 10,8,7 Users
Windows 10:
- Choose start tab, then settings > accounts .
- Now select the option of family and other users, if appropriate.
- Then choose the option to add to this device.
- Afterward, choose I don’t have this person’s log-in info & add a user who does not have a Microsoft account.
- Then, give the account a new id and password.
- After that, select the option of finish.
- Then, give the admin permissions to new user.
- When you’re finished, select newly created a/c & then account type.
- Choose the tab of admin.
- Finally, select the OK & Save options.
Read More about- Easy way to Fix QuickBooks Error Code H202
Windows 7 and 8:
- Hit on the Ctrl + R button and open the Control panel.
- Choose user accounts, then control another account and finally make the new account.
- After that, fill in the user’s name, choose admin tab, & then hit the create button.
Method 7: Run the Company File
- You must first go to the QBs file menu & choose switch to mode of multi-user.
- Then, in the window of multi-user setup, choose Yes.
- On the multiple-user setup info window, click the OK tab.
- Finally, finish the procedure by adding users by going to business > setup users & passwords > setup users
- Lastly, add user, & you’re done.
Wrapping Up!
You have learned how to setup & install a multi-user network for QBs Desktop in this post. Multi-user mode can help make this process go more smoothly and efficiently. In a nutshell, setting up a QB multi-user network is a must, especially when you have a large company.