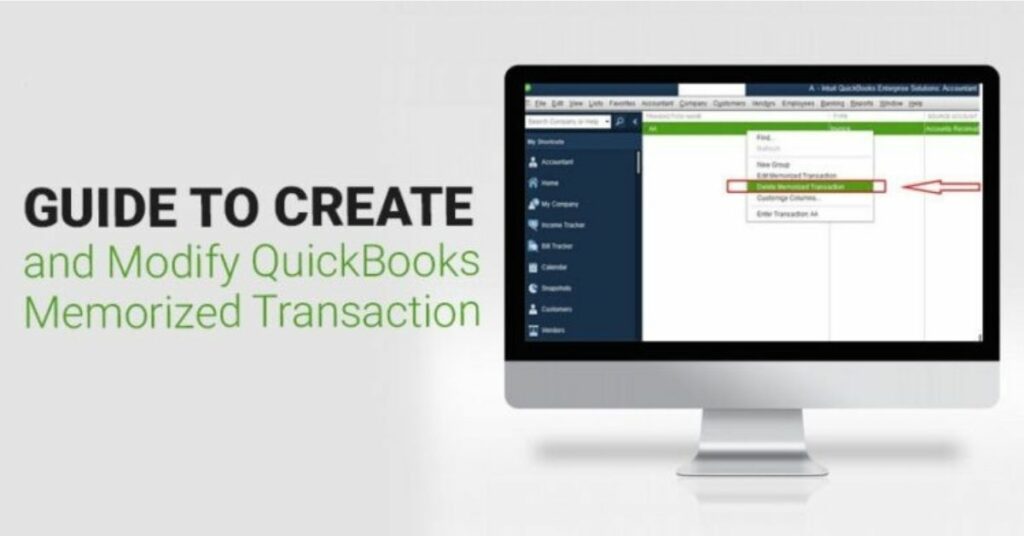
People rely on technology to save their precious time and ease up their workload. In businesses, you cannot ignore recurring payments and QuickBooks offer the perfect solution for it as QuickBooks memorized transactions. It’ll remind you regarding your recurring payments and also serve as a template when entering your data.
It can be used to create, edit, as well as to export a memorized transaction. Both QuickBooks Online and Desktop provide the option to create, edit, and export such transactions. It requires proper instructions to use this feature and this quick guide will help you utilize this feature on Windows or Mac. So, let’s begin.
Table of Contents
Explain QuickBooks Memorized Transactions

Memorized transactions QuickBooks is one of the key features provided by QuickBooks. It helps a company or individual by sending frequent reminders of their recurring business transactions.
This helps in entering data quickly using a template. As they function as templates, companies and individuals are able to make quick entries of their day-to-day transactions.
| Benefits of memorize transactions in QuickBooks |
| – Maintains better control over cash in your bank. |
| – Proper bookkeeping. |
| – Precise accuracy. |
| – Time-saving. |
Transactions suitable for Memorized Transactions
When you make a new transaction, take a moment to think about creating a database transaction that can save you any time down the road.
You can also record the transaction in a way that reminds you automatically or you can manually enter it into the template database when it’s needed.
Below are the transactions that are most suitable for being memorized transactions in QuickBooks:
Recurring Purchase Orders
- Purchase Orders that repeat with several of the same products. When you make transactions such as these, you can choose manually from the list of memorized transactions and remove the lines to exclude items not required for the next purchase.
Recurring Sales
- Recurring sales for the supply of products or services based on a regular or monthly basis.
Cash Flows
- Recurring checks in your QuickBooks or other personal services payable on a regular basis.
- Electronic withdrawals of checks every month like installment payments of business
- Insurance or payments made through internet access.
- Monthly installments are due from customers
- Health insurance premiums for the month
- Recurring invoices/bills in QuickBooks
- Payments for lease or loan
- Tuition invoices
- Rent Collection
- Rent Payable
Journal Entries
- Journal entries for Monthly Depreciation
- Overhead is allocated to other departments
Recurring Estimates
- If you choose the same items frequently while making a quote.
How to create QuickBooks Memorized Transactions?
Creating a memorized transaction in QuickBooks can be done online as well as in desktop version using Windows or Mac system. Make sure you consider the following points beforehand.
- Ensure to set “Next Date Select” to a future date because of the automatic schedule.
- When filling out the “Number Remaining” field, make sure to include “Next Date Transaction”.
- In case you wish to enter crucial information in the Transaction, enter the same then click “Ok”.
- Always click “Save & Next” or “Save & Close” to finalize your “Memorized Transaction”.
- If providing the transaction information for a later purpose, choose the “Clear” button then close the window.
After you consider these points, the below methods will help you create memorized transactions in your QuickBooks.
Method 1: Creating Transactions on QuickBooks Desktop – Windows
The steps for creating memorized transactions on QuickBooks Desktop are below:
- To begin with, run QuickBooks Desktop.
- Then, visit the “Homepage” and select “List”.

- Next, select “Memorized Transactions”.
- After that, input the transaction without saving it.
- Also, choose “Edit” menubar and select “Memorize”.
- Now, give it a name and choose an option for handling the transaction.
- After that, provide the information as prompted.
- Finally, click “Ok” and press “Save & Close” or “Save & Next”.
Method 2: Creating on QuickBooks Desktop – Mac
If you need to create QuickBooks Memorized Transaction through a Mac system, you can use QuickBooks Desktop for it. Follow these steps:
- First, launch QuickBooks-Desktop on your Mac and visit the “Homepage”.
- Then, Open/Create that transaction you wish to memorize.
- After that, click “Edit” and select “Memorize”.
- Next, set up the following info about your transactions:
- 1- “How Often”
- 2- “Remind Me”
- 3- “Automatically Enter”
- 4- “Next Date”
- 5- “Number Remaining”
- 6- “Days in Advance to Enter”
- 7- “With Transactions in Group and Group Name”
- 8- “Show in Calendar”
- Once done, select the “Lists” menubar.
- Then, choose “Memorized Transactions”.
- Next, select “Settings” and click “Use”.
- Now, modify the changes accordingly.
- Finally, click “Save” to create a memorized transaction on Mac.
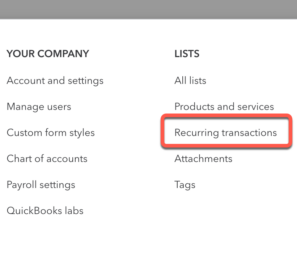
Method 3: On QuickBooks Online
If you utilize the online version of QuickBooks rather than the Desktop, the steps for creating memorized transactions vary. Here’s how:
- First, ensure you’ve access to good internet connectivity.
- Then, run “QuickBooks Online” and choose the Gear Icon.
- Next, select the “Recurring-Transactions” tab.
- After that, click “New” and select the transaction type.
- Now, tap “Ok” and provide a “Template Name”.
- Also, click “Type” and choose among “Unscheduled”, “Scheduled”, or “Reminder”.
- Finally, input the remaining information and click “Save Template”.
While creating the memorized transaction, verify that the values and data you entered are correct.
Creating a Memorized Transaction Group
If you have transactions that have identical due dates, you can easily create a transaction group that will help you remember them. Follow these:
- To begin with, choose “Lists” menubar.
- Then, click “Memorized Transaction List”.
- Next, Select “Memorized-Transaction” and scroll down.
- Now, opt for “New Group” and input frequency, group name, etc.
- Finally, click “Ok” to create a memorized transaction group.
Fix issues that occur during memorizing reports
If the QuickBooks user experiences an error message when trying to create a memorized report, QuickBooks won’t be able to save the report.
It could be due to the fact that the report’s description is too extensive. In this case, you need to try decreasing the channels, or the specific quantities of items that are used in every channel to reduce your report’s size.
If you choose the “Process Multiplier Reports” option from the “Reports” menubar but the report doesn’t show up, this could be from a corrupt report or a report taken from a different version of QuickBooks.
In these instances, you must find, erase, and then re-create the report that caused the issue.
How to Edit Memorized Transactions in QuickBooks?
You might want to modify the transaction you have saved on QuickBooks Desktop on Mac or Windows. The program’s “Lists” option offers you the ability to edit your transactions.
Method 1: Edit Transactions on Windows
Editing memorized transactions using QuickBooks Desktop on Windows consists of these steps:
- Start with, launching QuickBooks Desktop on Windows.
- After that, select “Lists” menubar.
- Then, double-tap on the transaction you wish to edit.
- Next, customize it according to your needs.
- Now, on the top, click “Memorize”.
- Also, to update the transaction, click “Replace”.
- Moving ahead, for creating a new transaction, choose “Add”.
- Finally, use “Save & Next” or “Save & Close”.
Method 2: Edit on Mac
You can also edit memorized transactions under QuickBooks Desktop on Mac. Here’s how:
- Launch “QuickBooks-Desktop” from your Mac.
- Then, locate and select “Lists”.
- Next, tap “Memorized Transactions”.
- Now, visit “Edit” and tap “Edit Memorized Transaction”.
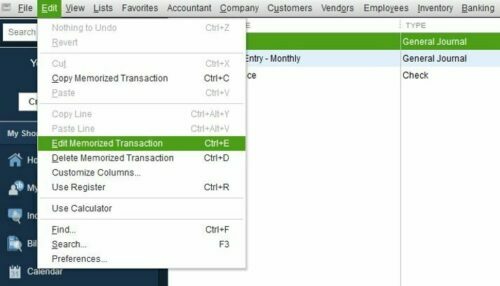
- Finally, edit a memorized transaction in QuickBooks and press “Save”.
While editing the transaction, always verify the data to prevent deleting memorized transactions in your QuickBooks.
How to Delete QuickBooks Memorized Transactions?
Memorized transactions can be manually deleted from QuickBooks Desktop on both Windows and Mac by accessing the “Lists” menubar. This menu is useful with a range of options available including the deletion of memorized transactions.
When deleting a transaction, we recommend you choose the correct transaction to delete. Now, let’s explore the ways to delete QuickBooks memorized transactions in your QuickBooks Desktop for different OS.
Method 1: Delete Memorized Transactions on Windows
QuickBooks desktop users on Windows OS can delete a memorized transaction by these steps:
- First, launch “QuickBooks Desktop”.
- Then, select the “Lists” menu.
- Next, click “Memorized Transaction List”.
- Now, tap on the transaction you wish to delete.
- After that, right-tap “Memorized Transaction”.
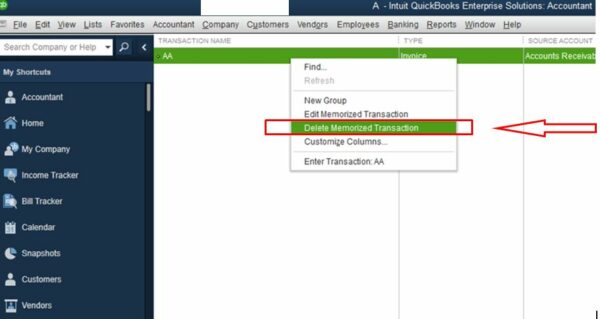
- Also, click “Delete Memorized Transaction”.
- Finally, tap “Ok” to delete the memorized transaction.
Method 2: Deleting Transactions on Mac
If you’re on Mac OS and want to delete some memorized transactions that are no longer required, follow these steps:
- Run “QuickBooks Desktop” on “Mac”.
- Then, find and click the “Lists” menu.
- Next, press “Memorized Transactions”.
- Now, hover to the “Edit” menu and click it.
- Finally, hit “Delete Memorized Transaction”.
Exporting Memorized Transactions from QuickBooks
It is easy to export your lists of memorized transactions from QuickBooks to use the lists however you like. Here’s how:
- Initially, log in to your QuickBooks account.
- Then, visit its dashboard and select “Reports”.
- Next, choose “Lists” and click “Memorized Transactions Listing”.
- Now, use the “Excel” option to generate a new spreadsheet.
- Finally, export your memorized transaction.
Once the sheet gets prepared, you can export it to any required software. The final process for exporting QuickBooks Memorized Transactions may take a while.
After you prepare the sheet, you can now export the transactions to the required software. Furthermore, exporting Memorized Transactions may require several hours.
Frequently Asked Questions (FAQs)
Q1. What is the purpose behind the QB memorized transaction feature?
The major purpose behind Memorized transactions is to help companies and individuals get reminders of their recurring business transactions. As the feature works as a template, it becomes simple to create quick entries of transactions.
Q2. How to disable memorized transactions in QuickBooks?
You can disable QuickBooks memorized transactions using these steps:
- Run QuickBooks and select “Lists”.
- Choose “Memorized Transaction List”.
- Right-tap any memorized Transaction.
- Select “Edit Memorized Transaction”.
- Click “Do Not Remind”..
- Press “OK”.
Q3. How to generate a memorized invoice under QuickBooks?
Creating memorized invoices in QuickBooks required the following steps:
- Create/Open an invoice.
- Tap “Memorize” above the transaction.
- Input a Name and choose the way QuickBooks will handle it.
- Provide other info and choose “Ok”.
- Either choose “Save & Next” or “Save & Close”.
Q4. How do I clear an un-entered transaction from the past?
To clear an un-entered memorized QuickBooks Transaction, perform these:
- Launch “QuickBooks”
- Select “Edit”.
- Choose “Preferences”.
- Click “Reminders”..
- Tap “Company Preferences”.
- Select “Don’t Remind Me”.
- Hit “Ok”.