


QuickBooks Repair Tool Hub Download: Installation steps included
After connecting your laptop or computer system to an active internet connection, Fill the form given above to locate your account and QuickBooks tool hub download. Start the download process by selecting the path and drive to store them in the hard drive, and then follow the upcoming steps to install them.
- Launch the QuickBooksToolHub.exe file by double-clicking on them using the connected mouse.
- A new installation window shall load up, from which you need to click upon ‘Next’ button.

- The ‘License Agreement’ shall get showcased, and you need to read through them and accept it by clicking on the ‘Yes’ button.
- In the next window, you need to choose the destination folder that has free space to install the tools hub in them.
- Click on the ‘Change’ button to choose the destination path and then click on ‘Next’
- Now you are all set to install the tools hub into your computer. Select ‘Install’ from the window.
- Wait until the installation process gets over.
- You can repair tools has been successfully installed, you can either click on the ‘Finish’ button and close the installation wizard, or place a tick on the ‘Launch QuickBooks Tool Hub’ to start using them.


Different tools present in QuickBooks tool hub
QuickBooks tools hub holds onto various tools that any QuickBooks user can use to resolve an issue. Every other tab present in the tools hub has its own set of usage incorporated in a way to address multiple problems.
Company-file issues tab:

Company files do face data damage at times, and it can be cleared by using QuickBooks File Doctor. There is no need to download the file doctor tool separately, as the tools hub has it integrated within them. All you need to do is to run File Doctor through the tools hub, browser and select the company file, login with the right credentials, and then diagnose to resolve the on-going data damage issues.
Network Issues tab:

Network errors like H202 can be solved by accessing this particular tab in the QuickBooks tool hub. You must open up the tools hub from the server or the system that has been hosting the company file and facing network issues. Under the network issues tab, QuickBooks Database Server Manager gets integrated to diagnose and resolve the issues on-the-go.
Program Problems tab:
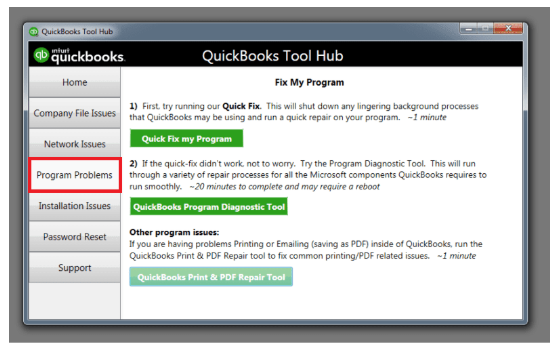
Under this tab, you get three different ways to fix the on-going program related problem. First is the ‘Quick Fix my Program’ option that shuts down any kind of lingering process that has been actively running in the background and try possible ways to solve the issues. The second is the ‘QuickBooks Program Diagnostic Tool’ takes around twenty minutes to diagnose and clear the issues. You might have to reboot the computer after resolving the program-related issues using this particular tool. The third is the ‘QuickBooks Print and PDF Repair Tool’ that solves errors faced by QuickBooks users while emailing or printing PDF within the QuickBooks application.
Installation Issues tab:

If there is any kind of problem stopping you from installing, reinstalling or uninstalling QuickBooks Desktop application then this QuickBooks repair tool tab can help in solving them. Use the QuickBooks Install Diagnostic Tool to fix any kind of common issues that has been creating installation issues. If this tool doesn’t resolve the problem then you can click upon the ‘Clean Install Tool’ button to remove the program files that has not been removed previously.
Password reset tab:

In case if you have forgotten the password or been facing multiple password-related issues then navigate to this tab in the QuickBooks tool hub. You need to open up the company file and then click upon the ‘Forgot Password’ option. Enter down the phone number, license number, email address, zip code, along with the username that you have previously used to create the account. After entering and submitting the required details, check the inbox of your email and copy the provided token number. Paste them into the respective field in the tools hub and then enter down a new password