
In today’s world QuickBooks is the market’s top software. Its popularity can be merely traced to several factors. One of these reasons is that owners draw QuickBooks. It is critical to understand that an owner draw account is a form of equity account in which QB desktop records assets withdrawals from the firm to pay the owner.
In this article, we’ll go through how to set up and pay the owner’s draw in QuickBooks Online and QuickBooks Desktop. To gain insight, keep reading this article till the conclusion.
Table of Contents
What is Owners Draw QuickBooks?

The terms “owners draw QuickBooks” and “owners draw account” are used interchangeably. It is a type of equity account that enables the tracking and monitoring of the firm assets in connection to the payments to the business owner. In certain cases, company owners opt to use compensation draws rather than pay salaries for their jobs.
The term “Draw” refers to when an owner withdraws an amount of cash for their use.
Owners can easily reclaim the amount they contributed and the incomes they invested in the company.
It will, however, let you explain general account financial computations such as business revenues, charges, and total money used for personal reasons.
Read- What is QuickBooks self employed version
Create Owners Draw Account in QuickBooks
When determining how much you may withdraw from the owner’s draw, you must concentrate on fewer points. These considerations are a must-have before proceeding to the section on Setting Up Owner’s Draws in QuickBooks Online and QuickBooks Desktop. They are as follows:
- Your Company’s Cash Flows (inflow and outflow of cash in your business).
- Your company years will include a slowing season as well as a buying season.
It is fairly typical for your amount to change regularly, however, this is dependent on your organization.
Let us consider the following scenario: During the busy season, you can pay a bigger sum on your own since you have more cash flows. However, if you withdraw the same amount during the free season when you have very few clients and your source of revenue is poor, you will be unable to pay yourself due to low cash flows. Before deciding on a precise sum (how much you are willing to pay yourself) from the owner’s draw account. You must examine some more fundamental issues, such as running expenditures and other expenses.
Configure and Pay Owners Draw Quickbooks in QB Online
To understand how to enter Quickbooks owner draw, keep reading this article till the end.
Thus, to set up and pay the owners to draw in QuickBooks online, follow the steps outlined below:
Basic Instructions for Creating an Equity Account
Easily follow the steps mentioned below to create an equity account. Also, make an effort to finish all phases to acquire reliable results.
- To begin, launch the QB online program.
- Then, at the top, click the Gear icon.
- Continue to the Chart of Accounts option.
- By selecting the New option, you will be prompted to the Charts of Accounts window.
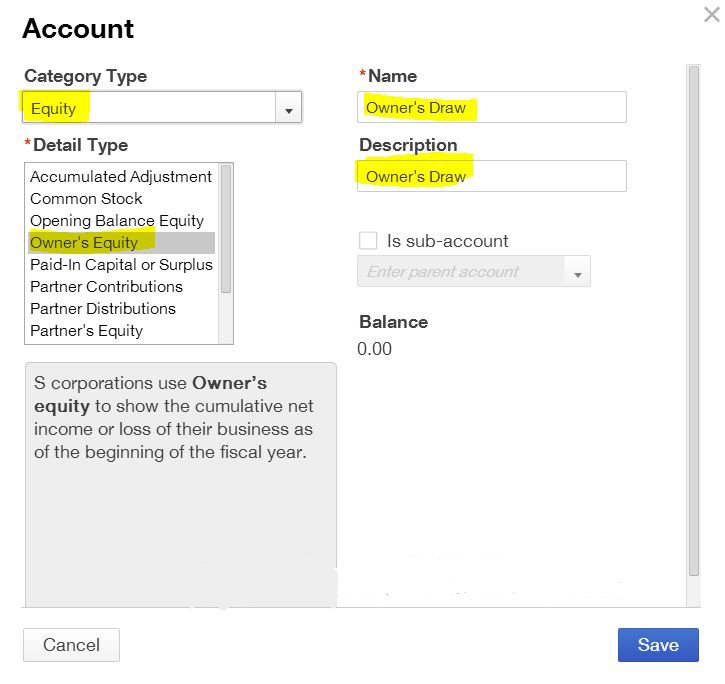
- Then, choose an account type from the drop-down menu.
- Also, choose Equity in the box.
- After that, Select a detail type from the drop-down menu.
- Choose the Owners Equity option.
- Fill in the opening balance, from the previous closing entry.
- Once the steps have been successfully performed, utilize the Save and Close option to conclude it.
Keep in mind that saves and closures are required to input entries into the Equity account. In case you do not save your data, it may be lost in future usage.
Make a Check from the Owners Equity Account
- First, click the New button.
- You must now tick the box.
- Then, select a bank account from which you want to withdraw your cash.
- If you wish to print the check later, select the Print Later option.
- You must fill out the checkbox.
- After you’ve completed the checkboxes, make sure you’ve selected the Owners equity you created and input the Account Field in the app.
- Remember that the Memo field is optional for you. It can be found in the register, on printed checks, and in reports including this check.
- Finally, you may pick Save and Close if you don’t have any more checks to add or Save and New to make a new check.
- This will also help with the storage of written content.
How to Enter Owner’s Draw as an Expense in QuickBooks Online?
It has been discovered that owners draw QuickBooks that can be added to QBO as a cost. To record it in this manner, first press the Plus (+) button. Then choose Expense and go to Payment Account. You will see Equity if you use this dropdown. This option will help you keep track of the drawings as costs.
- In “QuickBooks Online,” select “Plus (+).”
- Select “Expense” from the drop-down menu.
- Select “Payment Account.”
- Choose “Equity” from the resulting menu.
- Fill in the blanks with the information requested in this stage.
- In the last step, you need to hit “Save and Close.”
- The specifics of the drawings must be mentioned in Step 5 of the approach given above. The quantities involved must be correct. Otherwise, the recorded drawings may have an impact on your financial records.
Configure and Pay Owners Draw QuickBooks in QB Desktop
Users can go with the mentioned procedure to set up and pay the owner to draw QuickBooks in the QB desktop version.
Step-by-Step instructions to Create Owners Draw Account
To create an owners draw QuickBooks account, follow these steps:
- Select the Lists menu item in the QB desktop program.
- Then, from the menu, choose COA or press Ctrl + A on your keyboard.
- You must first pick Account
- After that, click the New option from the menu on the bottom left.
- Proceed to select Equity.
- Enter your account’s name and description here (Owners draw is a must)
- When you’re finished, click the Save & Close button.
Make Checks from the Owners Draw Account
Follow the procedures below to issue a check from a QuickBooks owner draw account:
- Click the Banking menu item in the QB program.
- Then, select the Write Checks option.
- Click on the tab Pay to the order in the Write Checks box.
- Click on the Owner link in this section.
- Now, type the amount, followed by the $ sign.
- Navigate to the check’s detail page.
- The amount of the check is surely credited to the equity account that you previously established.
- Finally, click the Save and Close button to save the changes and close the window.
Methods to Record Owner’s Investments After Paying and setting up the Owner’s Draw n QuickBooks
- At first, hit the +Sign option in QBs online.
- Then, hit the account option by choosing the choice of Bank Deposit.
- Now, you have to select the bank a/c in which you desire to deposit your money.
- Make sure that you mention the current date in the column of date.
- After that, Navigate the Add funds.
- Mention the investor’s name to the received field.
- Select the equity a/c from the list of accounts.
- Give the name of the payment method.
- Lastly, hit the save & close option.
Methods to Add the New Owner
To add the new owner, you need to follow the below-mentioned steps.
- To start with, hit the expanses tab in the QBs online.
- Now, you have to select the option of Vendors.
- After that, choose a new vendor option to add the new owner.
- Then, you need to fill in the information that is required.
- At last, you must hit the save option to finish the steps.
Steps to connect the Bank Account
Follow the below-mentioned steps to build the connection of the bank account after paying and setting up the owner’s draw in Qbs online.
- To begin with, hit the banking option. Now the pop-up window will show on the screen.
- In case it is your first time, you need to select connect account by clicking on the tab of banking else you need to hit the link account or the option of add account.
- Navigate the bank a/c to connect.
- Now, follow all the instructions that are shown on the screen by clicking the continue.
- After that, choose the bank a/c.
- Then, select the type of account in order to connect.
- Thereafter, select the time period for downloading the transactions.
- Lastly, hit the button connect.
Wrapping Up!
We believe, this article involves all the information regarding the owners drawing QuickBooks. However, if you face any issues you can connect with the technical team for further assistance.