QuickBooks Error 3000 is a software error that often occurs while users are attempting to perform common tasks in QuickBooks. This error usually appears when users try to open QuickBooks or access it online, though it can also appear when users are trying to create a new file or exporting data from QuickBooks. In most cases, QuickBooks Error 3000 is actually part of a broader error series with similar symptoms and root causes.
These include QuickBooks errors 3020, 3080, 3070, 3040, etc. Each of these errors arises from different software issues, including corrupted files and out-of-date program components. Because each error has unique root causes, fixing one may do nothing to resolve the remaining errors in the series. However, there are some general steps that can be taken to fix QuickBooks Error 3000 and its related series.
In this article, we will mention different situations of the QuickBooks Error 3000 series, relevant series error code along with its different kinds of solutions for fixing these errors, and many more. Just be with us till the end and get more ideas for troubleshooting.
Table of Contents
Effective Solutions to Resolve QuickBooks Error 3000
List down below are some of the major causes of the QuickBooks Error 3000, along with the effective solutions to resolve such an error. Make sure to create a backup of your QB Point of Sale and QB Desktop files before proceeding with such steps.
Situation 1: QuickBooks Error 3000; Message: Object ID in the Field “List Id” is Invalid
When QB financial has an outdated version, the QuickBooks Error 3000 appears. So, you can resolve it by following the steps below:
- At first, navigate to Download and Updates tab.
- After that, locate the QB Versions.
- Finally, click the Get Latest Update button
Situation 2: QuickBooks Error 3000: Employee Hours Message: Object ID in the Field “List Id” is Incorrect
This type of QuickBooks Error 3000 occurs when an employee is inactive or the track data is not properly configured. To resolve such an error code, follow the below steps.
Solution 1: Configure the Track Data Time Feature
- First, navigate to Employees and then to Employee Center.
- Then, check the activity log for the specified employee.
- After that right-click on the employee’s name, then select Edit Employee.
- Also, select the Payroll Info tab.
- Check the box next to use time data to generate paychecks.
- Finally, press the ok button.
Solution 2: Activate Inactive Employees
- First, select Employee Center from the Employee menu.
- Then, select All Employees from the drop-down menu in the Employees Column.
- Also, look for your desired employee in the activity log.
- At last, right-click on the employee’s name and select Make Employee Active.
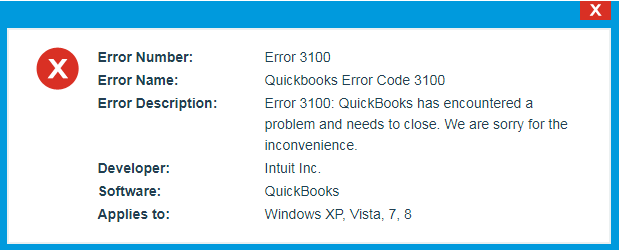
Situation 3: Status Code 3100; Message: Element List Name “####” is in Use
This QuickBooks error code appears when a vendor’s data or customer’s data is corrupted or duplicated in QB Desktop or QB Point of Sale. Then, the QB error code 3100 arises.
Solution 1: Find the Identical Names
In QB Desktop
- Look for the Customers or Vendors tab and then choose Customer or Vendor Center.
- Also, look for the name that appears in the error.
- Then, search for any identical names.
- If there are any, combine them.
- When there are no duplicates, proceed to the next step.
In QB Point of Sale

- Choose Customers (Purchasing) from the menu and then choose Customer or Vendor List.
- Input the name from the error message into the search field, then look for duplicates.
- With the help of drop-down menu, select “I want to…” and click Merge.
- When the Merge window appears, choose the customer or vendor you wish to keep and remove.
- Finally, choose the option to Merge Customers or Vendors.
Solution 2: Restore the Damaged Customer or Vendor Names
Make a New Customer or Vendor
- First, go to the Customers menu and choose the Customer Center.
- Choose the New Customer and Job tab, then using the drop-down menu, select “New Customer.”
- Input Test Customer for the name and leave the rest blank.
- Finally, press the OK button.
Merge the Names
- To begin, click on the customer’s name and choose the Edit customer tab.
- Move your mouse over the Job and a blank cross appears. Drag the cross to the name of the new customer.
- Then, change the customer or vendor’s name by typing “Type Customer” and then hit Ok.
- This will open the merge, then click the Ok button.
- Edit the customer or vendor name by entering the original name, then hit Ok.
- Finally, try closing QB Desktop and then reopen it.
Situation 4: QuickBooks Error Code 3000 Series- 3140 or 3120 Error Status Code: Specified Account is Invalid or of the Incorrect Type
This QuickBooks Error code 3000 series message appears if the accounts are not properly mapped. Simply follow the steps below to repair QB error 3140:
- First, launch QB POS.
- Then, select the Preferences tab from File menu.
- Then, under the Financial tab, select Company >> Accounts.
- Now, navigate to Basic and Advanced tabs and make sure that the accounts are correctly mapped, then click on Save button.
- Finally, you must carry out the financial transaction.
Situation 5: Status code 3140: Receipt or Bill Contains an Invalid Reference to the QuickBooks AR/AP Account “### – ####”
When the accounts payable and receivable in POS are mapped to the incorrect accounts, this error code is generated. The problem message you receive indicates that a setting is incorrect.
When the Status code 3140 arises, the following error messages appear:
- The receipt contains an invalid reference to QB AR Account “### – ####.” This transaction account must be the Accounts Receivable type.
- The bill contains an invalid reference to QB AP Account “### – ####.” This transaction account must be the Accounts Payable type.
Follow the troubleshooting steps to rectify the error from appearing on your screen:
-
- To begin, launch QB Desktop Point of Sale.
- Then, from the File menu, choose the Preferences tab.
- Following that, select the option Company.
- Then, in the Financial section, choose the Accounts tab.
- Ensure that the accounts are related with an A/R and A/P account, then click Save.
- As the final step, the Financial Exchange must be carried out.
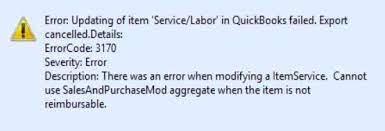
Situation 6: Status 3170 Code: An Error Occurred While Attempting to Modify a Vendor/Customer List Element
The status 3170 code arises when the names of QB Desktop POS and QB Desktop are similar.
Step 1: Check the Activity Log in QB Desktop POS
In QuickBooks error 3170, the customer or vendor’s name appears. However, Step 2 is optional if you already know the name. If this is not the case, perform the following steps:
- To begin, choose the Customer List option from the Customers menu.
- Next, right-click on a column header and choose Customize Columns, and then hit QB Status.
- To sort the list, click on the QB Status header.
- Look for the customer name that has a Not Posting or Error Status.
- The same procedures users must follow for the vendor list.
Also Read :How to resolve QuickBooks Error PS077?
Step 2: Change the Name of a Customer or Vendor
- First, in QuickBooks Desktop, go to the Customers menu and choose Customer Center.
- Then, navigate to Vendors menu and click on the Vendor Center.
- Select the Edit tab after right-clicking on the listed name in the Activity Log.
- Then, at the end of the name, add the number “1,” and then click Ok.
- After that, you must finally run the Financial Exchange.
Step 3: Combine the Edited Names
- Combine the edited and new names developed by Financial Exchange in QB Desktop.
- Click twice on the edited name.
- Delete the number “1,” then press OK.
- QB will remind you to combine the customer or vendor with the Financial Exchange customer or vendor.
- Finally, click the Yes button to confirm the process.
Wrapping Up
In this article, we have summed up the QuickBooks Error 3000 including its related series like 31400, 3100, 3120, 3140, 3170, 3180, etc. We have tried to discuss all the situations that you can face in this error and also mentioned the error message along with its troubleshooting methods. We hope that you liked this article and it is useful and informative to you.