As technology develops, the need for a new computer becomes inevitable. However, after purchasing a new computer, QuickBooks users find difficulty in transferring their QuickBooks and wonder how to transfer QuickBooks to a new computer.
In this regard, we’ve prepared a quick guide that will cover all the methods to transfer QuickBooks to another computer as well as the requirements for a proper transfer. So, let’s begin.


 5. Locate and select the storage device then click “Next”.
6. Click “Save It Now” followed by “Next”.
7. Tap “Save” and the backup files will be created.
 6. Tap on “Local Backup”.
7. Locate your storage device.
8. Also, select your QuickBooks backup file.
9. Choose “Open” and “Next” respectively.
10. Confirm for restoring the backup files.
11. Click “Save” to begin restoring.
Table of Contents
Requirements to Transfer QuickBooks to a New Computer
Before you begin to transfer your QuickBooks to the New Computer, make sure to meet the following requirements:- Keep the QuickBooks license as well as product key information with you.
- Keep a USB Flash drive with enough storage for QuickBooks files.
- Also, make sure to have active and reliable internet connectivity.
- Ensure to back up QuickBooks company files.
Methods to transfer QuickBooks to a New Computer
QuickBooks can be transferred to a new computer using multiple methods. Let’s explore them.Method 1: Via QuickBooks Migration Tool
The most effective and simple method to transfer QuickBooks is using the QuickBooks Migration Tool. It works for QuickBooks Desktop 2022 and newer versions. Since users ask how to transfer a program from one computer to another without cd? Now, users should perform the following steps to transfer the QuickBooks to a New Computer.On Old PC
The first step is to perform the following steps on your old computer:- First, insert the Pen Drive into your PC and run QuickBooks Desktop.
- Thereafter, click the “File” section from the menu bar.
- Next, choose “Utilities” and opt for “Move QuickBooks to…”.
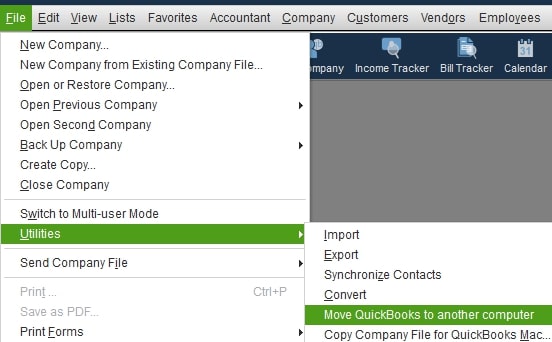
- Now, tap “I am Ready”, and then create the password.
- Finally, select “Pen-Drive” and let the data be copied.
On New PC
After you copy the QuickBooks data to your Pen Drive, perform the QuickBooks downloads appropriately and follow these steps:- Start with inserting the Pen Drive into your new computer.
- Then, launch “This PC”. Also, access your Pen Drive.
- Next, run the “Move_QuickBooks.bat” file.
- Now, input the password you generated on your old PC.
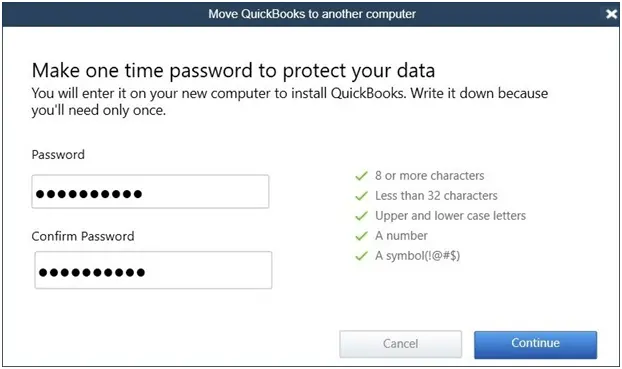
- Finally, choose “Let’s go”.
Data that copies through QuickBooks Migration Tool
All the data required for QuickBooks Desktop operation gets copied. However, due to Intuit’s protect policy, it does not copy certain data. Below is the list of data that gets copied via QuickBooks Migration Tool:- Custom templates and forms.
- Scheduled and memorized reports.
- QuickBooks templates as well as letters.
- Also, some local attachments.
- Financial Statement Designer.
- Spell Checker (spell.ini and UserDictionary.tlx).
- Printer Setting as well as Business Planner (.bpw).
- Cash Flow Projector (.cfp) as well as Loan Manager (.lmr).
- Advanced reports (available for QB Enterprises).
- Statement writer (available for QB Accountant).
- Multi-user configurations.
- Payroll and payments services.
- Intuit Data Protect Settings.
- Company files that were not opened recently.
- Also, backups are created manually by the user.
Method 2: Manually Transferring QuickBooks to a New Computer
Since QuickBooks users also ask how to transfer QuickBooks to a New Computer manually? Below are the steps to transfer QuickBooks to a New PC:Step 1: Create A Backup on your Old Computer
The first step is to create a backup of QuickBooks from your old computer. Hence, follow these: 1. Connect a USB or external HDD to your old computer. 2. Run QuickBooks Desktop on your old computer. 3. Select the “File” menu to choose “Create Backup”. 4. Click “Local Backup” as well as “Options”.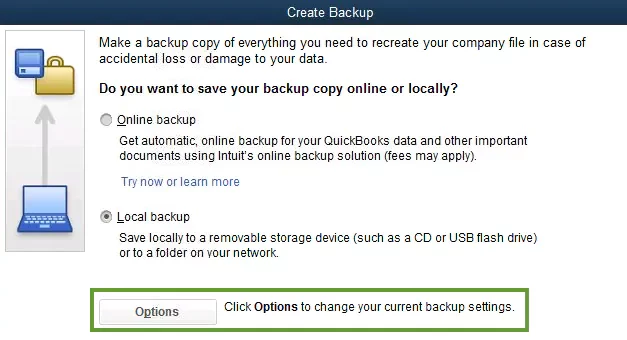 5. Locate and select the storage device then click “Next”.
6. Click “Save It Now” followed by “Next”.
7. Tap “Save” and the backup files will be created.
Also Read: QuickBooks Portable Company File – A Comprehensive Explanation
Step 2: Uninstall QuickBooks from the Old Computer
Uninstalling QuickBooks from your old computer requires the following steps:- Visit “Control Panel”.
- Reach “Program-Features”.
- Click “Uninstall a Program”.
- Select “QuickBooks 20XX”.
- Also, choose “Uninstall”.
- Select “Remove” and tap “Next”.
- “Finish” the uninstallation.
Step 3: Install QuickBooks to the New Computer
After uninstalling the QuickBooks, install QuickBooks on your New Computer. Here’s how:- Download QuickBooks on your New Computer.
- Install QuickBooks appropriately and also, launch it.
- Finally, activate QuickBooks using the product and license key.
Step 4: Restore the Backup on Your New Computer
The final step to transfer QuickBooks to new computer is to restore the backup. Hence, perform these: 1. Insert the storage device into your new computer. 2. Also, launch QuickBooks Desktop. 3. Click on “File” menubar. 4. Choose “Restore Company.” 5. Click “Restore a Backup” followed by “Next.”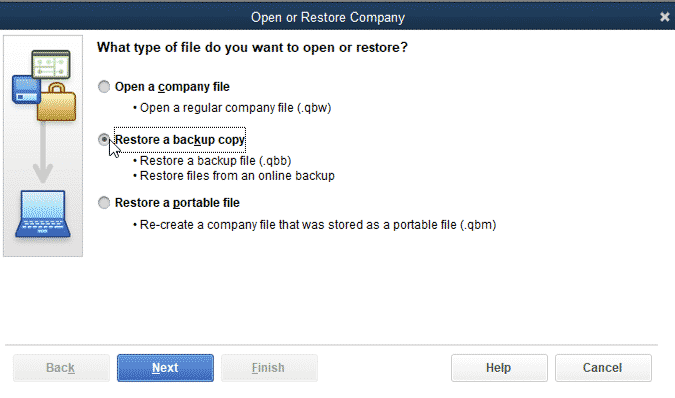 6. Tap on “Local Backup”.
7. Locate your storage device.
8. Also, select your QuickBooks backup file.
9. Choose “Open” and “Next” respectively.
10. Confirm for restoring the backup files.
11. Click “Save” to begin restoring.
Frequently Asked Question
Q1. How to Install QuickBooks on a New Computer?
QuickBooks can be installed on a new computer using the below steps:- First, create a backup from your old computer.
- Then, uninstall the QuickBooks Desktop.
- Next, download QuickBooks on your new PC.
- Also, launch the setup and complete the installation.
- Finally, activate your QuickBooks.
Q2. Can QuickBooks be used on multiple computers?
Yes, QuickBooks can be used on multiple computers. In addition, if users bought the single-user edition of QuickBooks then it entitles the user to install QuickBooks on two computers.Q3. How to transfer data from old QuickBooks to a new one?
The transfer of your crucial data from old QuickBooks to a new one can be done using these steps:- First, sign in to your existing account.
- Then, click on the Gear icon on Quickbooks.
- Next, select “Export-Data”.
- Also, select the data you wish to transfer.
- After that, click “Export to Excel”.
- Then, launch QuickBooks on your new computer.
- Also, select the “Gear” icon and choose “Import-Data”.
- Next, click “Browse” and select the exported data.
- Finally, click “Next”.

