Are you experiencing the Quickbooks Unexpected Error 5? Well, then you could not be in a better place than this for that. With the help of this post, you’ll be able to rectify the Quickbooks Event id 4 Unexpected error 5. Not only that, we will discuss every subtle detail about this error. So, basically, you can look error 5 in the eyes and say goodbye to it.
So, without wasting any more time let’s get the important things started.
Table of Contents
What is Quickbooks Unexpected Error 5?
The Quickbooks unexpected error 5, as the name suggests is an error that occurs in the Quickbooks desktop application unexpectedly. There are many causes that lead to this error. Let’s discuss them in detail.
Possible Causes of this QuickBooks Error
There are numerous reasons that can cause the QB unexpected error 5. You can keep them in mind to avoid this error from happening in the future. Let’s see the causes one by one.
- This error can happen because of poor network connections
- Another reason is the damaged network data file.
- Corruption of any company file.
- The user does not process the permissions to access the company files in multi-user mode.
- You may not be using the latest version of Quickbooks.
- The computer is under malware or virus attack.
- The last time you closed your computer, it was not shut down properly.
Now, that we know the causes of this error, it is time for us to understand the correct solutions to this error. You have to follow each solution one by one until you find the solution that applies to your case. Also, do not forget to create a backup of your important information.
Solutions to Resolve QuickBooks Event id 4 Unexpected Error 5
Multiple solutions can be used to fix this error. Here they are.
Solution 1: User file recreation
- First of all, open your QuickBooks desktop application. Go to the company tab.
- Now, choose users.
- Click on Set Up User and Roles.
- From the user’s list, you have to spot users experiencing errors and delete them.
- Next, click on create a new account. Put in your username and password.
- Finally, click on Ok.
Solution 2: Turn off UAC

Turning off the UC might help in resolving this error. Let’s see what you have to do.
- Firstly, open the control panel.
- Look for the User account.
- Now, click on Change User Account Control Settings.
- Next, select yes and move the slider to Never notify.
- Finally, restart your windows to save the changes.
Solution 3: Clean install QuickBooks
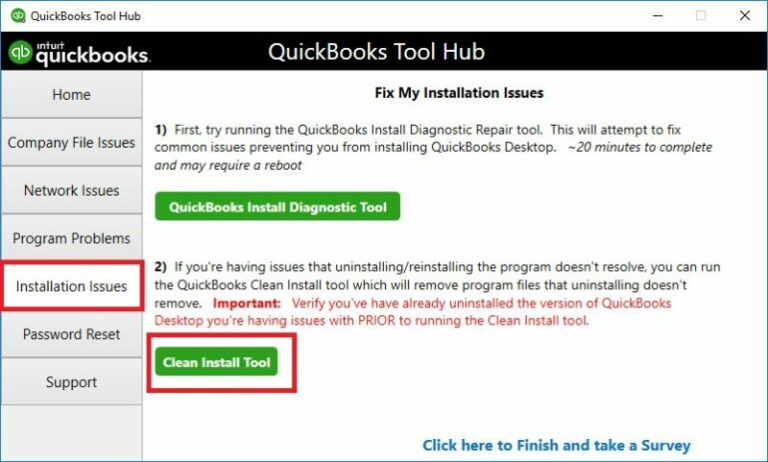
- To conduct a clean install, you’ve got to first download and install the Quickbooks Tool Hub.
- Now, launch the tool hub.
- Navigate to the installation issue section.
- Here you’ll see a green button named Clean Install Tool.
- Click it.
- Select yes if a permission window pops up.
- The QuickBooks software is going to be uninstalled and reinstalled automatically.
Also check: A Easy Guide to Resolve the QuickBooks Error -6073
Solution 4: Permit File Share Access
- First, provide file share access for the breakdown of the error.
- Launch the file explorer and right-click on any folder wherever the company file is saved. Open properties and navigate to the Sharing tab.
- Select full or partial sharing looking forward to what is needed for your business.
- Click on Apply and OK.
Solution 5: Reimage Repair tool
- First of all, download the Reimage repair tool.
- Click the file that has been downloaded to install the tool.
- Launch the tool and it will start scanning.
- Once the scanning is complete, you have to click on start repair.
- Restart your computer to check if the error still exists or not.
So, these were solutions to this error. Hopefully, you were able to fix this issue using our methods. Do check out other articles on our website. They have the capability to resolve other Quickbooks-related errors in just a matter of time.
Frequently Asked Questions
Q1 .How do I delete old backups in QuickBooks?
Over time, QuickBooks creates backups of your data in case of data loss. However, these backups can quickly accumulate and take up valuable storage space. To delete any old backup: simply open the Open the Application\QuickBooks\CompanyFileName\Backups folder. Once you have selected the desired backups to delete, click “OK” and QuickBooks will remove the files from your computer. By deleting old backups, you can free up space on your hard drive and keep your QuickBooks installation running smoothly.
Q2. How do I zero out an account in QuickBooks?
Steps to zero out an account in QuickBooks are:
- Navigate to Edi.
- Click on Preferences.
- Hit the option Accounting.
- Choose the Company Preferences option .
- Hover to the Closing date tab.
- Tap on the Set Date/Password option.
- In the window Set Closing Date and Password, pick the Closing Date.
- Type the Date Password. Now confirm it.
- In the end, Click OK.