
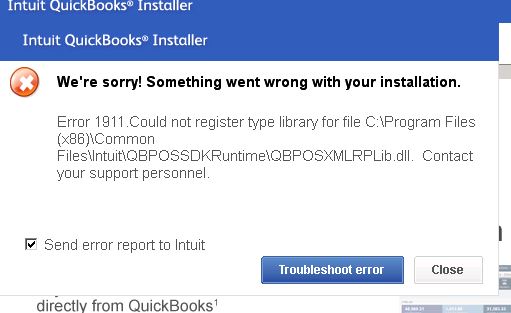
QuickBooks Error 1911 is an error that occurs when you install or upgrade the QuickBooks software. With the occurrence of this error, your computer system might be not functioning properly & you will receive the below-mentioned message.
We’re Sorry! Something went wrong with your installation.
Error 1911. Could not register type library for file C:\program files(x86)\Common
File\intuit\QBPOSSDKRuntime\QBPOSXMLRPLib.dll. Contact your support personnel.
In this article, we will walk you through the various causes and symptoms of the Quickbooks Error 1911. We will also provide you with the best and proven methods of fixing the error 1911 in QuickBooks. Without further delay, let’s deep dive into the article.
Table of Contents
Possible Causes of QuickBooks Error 1911
Here are some common reasons behind the occurrence of the QuickBooks error 1911.
- The registry driver error will lead to error 1911.
- Damaged installation of the QBs software triggers the 1911 error.
- It occurs if the administrator doesn’t have full access.
- When the PsExec file faces some issue, it appears on the screen.
Indications to QuickBooks Error 1911
We are going to discuss the signs and symptoms that will help you to identify the QuickBooks Error 1911.
- The Windows OS becomes unresponsive.
- The QBs software works very slowly.
- The QBs software does not respond to the inputs.
- Your system gets shut down frequently.
Troubleshooting Methods to Resolve QuickBooks Error 1911
There are various resolving methods that will help you to resolve the QuickBooks Error 1911. However, follow the methods sequentially in order to resolve the QuickBooks Error 1911.
Method 1- Download and Locate the directory PSExec
You need to follow these steps to download & locate the directory PSExec.
- To start with, you need to download the PSExec directory & install it.
- Navigate the QBs in that directory & access the command prompt.
- Next, navigate to the PSEcxec file.
- Start with your QuickBooks installation now & you must also install the diagnostic tool.
- Lastly, launch it via the installer.
- Restart your system and look out for the prevalence of the error.
Method 2- Uninstall the Adobe Flash Player
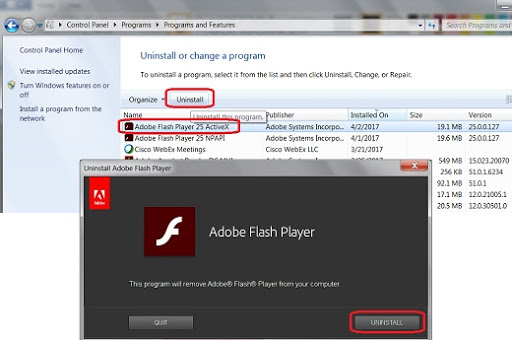
Uninstalling & Reinstalling the Adobe Flash Player will help you fix the QuickBooks error 1911. Go through the steps below.
- In the Search field, type up the Control Panel & hit Enter.
- Go to the Program & Features tab.
- From the upcoming list, select Adobe Player.
- With a right click, tap on Uninstall.
- Follow the instructions to finish the process of uninstalling.
- Lastly, you need to reinstall the Adobe Player in your system.
Method 3- Change the Set Up Editor’s Settings
Following are the steps used to change the settings of the Set Up in case you don’t require registering your file of the type library.
- From the Setup editor, select the TypeLib table.
- Go to the row of your file with the error & delete that row.
- Restart the system & check whether the error is resolved or not.
Method 4- Download and run the QBs Install Diagnostic Tool
Here are the steps that will help you to download & install the tool.
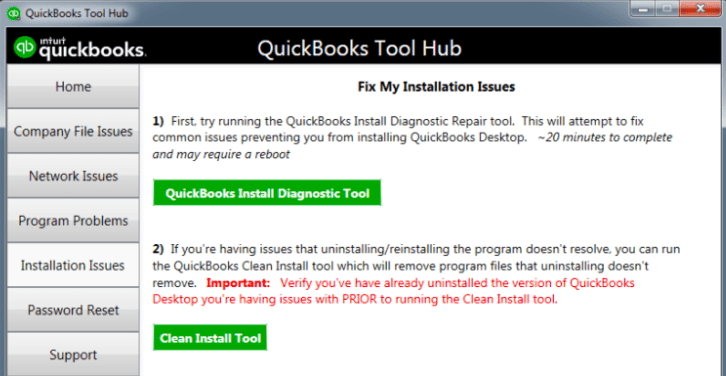
- To start with, you have to locate intuit’s official site.
- Now, download the QuickBooks Install Diagnostic tool & place the file into a folder.
- Then, close all the running software or apps.
- After that, find the QBinstall-tool-v2.exe & open it.
- Tap on yes to the license & agreement.
- Click to proceed to begin the scanning process.
- Thereafter, reboot your computer system.
- Launch the diagnostic tool.
- Now, you must give the QBs Id & credentials to access the diagnostic tool.
- Ensure that your OS is updated.
- To end with, start again your PC & save the changes that are done.
Method 5- Checking the Settings of In-Built Administrative
You have to follow the below-mentioned steps that will help you to confirm the admin settings. In this method, we will discuss each step in detail.
Steps 1- Turn on the In-Built Admin
Follow the below-instructed steps in order to activate the built-in administrator.
- Access the Run command by pressing the windows+R button simultaneously.
- Now, type CMD within the search field & press enter.
- Right-hit on the option CMD & go for selecting the option Run as an Admin.
- Then, locate the start button & type the command prompt to open it.
- After that, put the net user administrator & hit yes.
- Thereafter, press enter.
- Finally, start your PC in safe mode.
Step 2- Modify the Account of the Built-in Administrator
Now, you need to adjust the built-in admin account, follow below steps:-
- To initiate, press the Ctrl+Alt+Del keys simultaneously.
- Select the switch user option.
- Now, press the windows keys.
- Choose the user icon which was placed on the upper right side of the screen.
- Lastly, press the Ctrl+Alt+Del keys together & select the account of the default admin.
Step 3- Hide the Built-in Administrator Account
There are the steps that are mentioned below to hide your administrator a/c.
- Firstly, press the Windows+R keys & press enter. The Run windows will appear on your screen.
- Type the CMD in the search area to access the command prompt.
- Right-mouse click on the cmd.exe.
- Select the choice to run as an admin.
- Lastly, write No in net user administrator active & save it.
Step 4- Edit Security Settings of Installation Directory
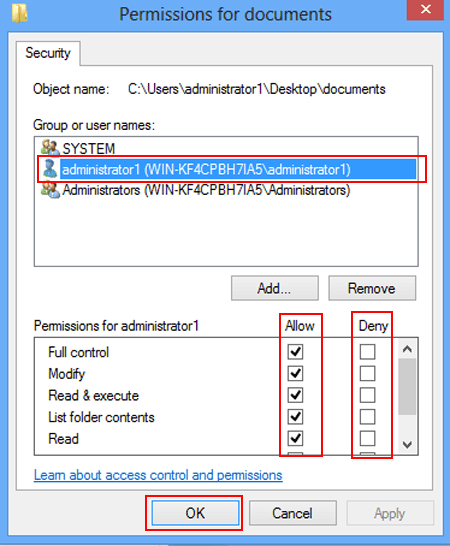
- Firstly, locate the C drive.
- Move towards Program Files.
- Go for Common Files & select the properties option.
- Tap on the edit button & choose the users option.
- Open the permissions option to grant the permissions.
- Finally, hit on Apply & save the changes.
Also Read : How to Resolve QuickBooks Error Code 1926 | Top 5 Solutions
Wrapping Up!
In this article, we have discussed the steps to fix QuickBooks Error 1911. Hope that all the above-mentioned steps are helpful for you and troubleshoot all the issues or errors that appear on your system. Make sure that you follow all the above steps carefully in order to resolve this issue. In case you can’t resolve the error 1911, you can take support of technical assistance that is available 24*7.