
QuickBooks helps users to print 1099 forms in the easiest way. But sometimes this task can be very difficult for those who are new to this accounting software. There are chances of mistakes and other technical errors. Hence, knowing the detailed steps is very important because one single error can ruin everything.
The QuickBooks 1099 form is similar to the W-2 but is for non-employees. Generally, companies issue 1099s to Non-corporate service providers for any payments they made in the last year. So, this is something that no company can ever ignore because if any details go wrong, it will affect your all employees and data.
Also, while preparing 1099s forms, you have to print out all 1099 forms, mail them, then complete your IRS form and after that send a copy to every contractor. Now you know that even a small mistake can lead to a huge blunder, so it’s important to print the forms correctly. Let’s learn all the steps in detail to print 1099 in QuickBooks Desktop, Mac, QuickBooks Online, Intuit, and Payroll services.
Table of Contents
How to Print 1099 in QuickBooks
Before creating a 1099 form in QuickBooks, review the IRS guidelines to determine if your vendor falls within the Independent Contractor category. We have listed the most important points to help you set up your Independent Contractors.
Setting up an Autonomous Contractor
- Firstly, open QuickBooks.
- Thereafter, navigate to “Edit” and click on “Preferences”.
- Now, select “1099” for tax.
- Click on “Company Preferences”.
- Tap on “Yes” after you get the option “Do you file 1099-misc forms?”
- In the end, select Ok to apply the saved changes you have made.
Adding a Vendor in QuickBooks
- Firstly, open Quickbooks.
- Then choose “Vendor Center”.
- Click the drop-down option and choose “New Vendor”.
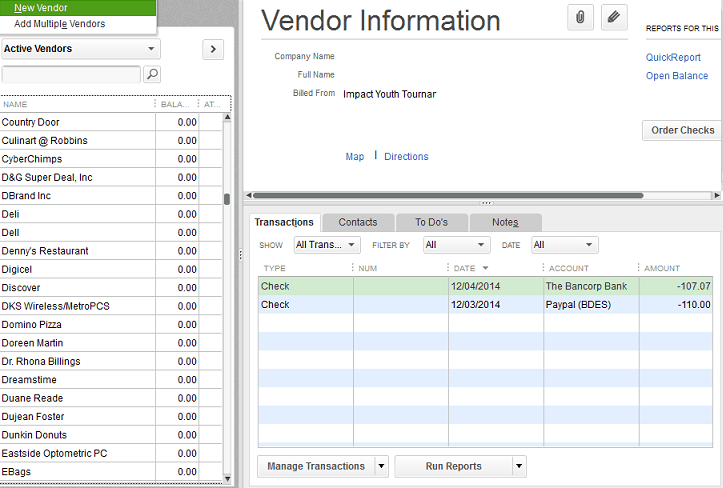
- Thereafter, type a name for the supplier inside “Vendor Name”. You will get this option under “Vendor Listing”.
- Now complete the details within all tabs.
- You can anytime modify the supplier details to include any additional info.
- In the end, click “OK”.
Setting up Vendors in QuickBooks to get 1099-MISC
- Firstly, open “Vendors”.
- Now choose “Vendor Center”.
- Locate your supplier’s name then right-tap on it.
- Thereafter, click on “Edit Vendor”.
- Finally, navigate to “Address Info” and check all the Details.
Setting up an Expense Account in QuickBooks Desktop
- Firstly, open Quickbooks.
- Navigate to “Edit”.
- Now tap on “Preferences”.
- At the left, you will find “Tax: 1099”, simply click it.
- Then, click on “Company Preferences”.
- After the option “Do you file 1099-MISC forms?” comes up, select Yes.
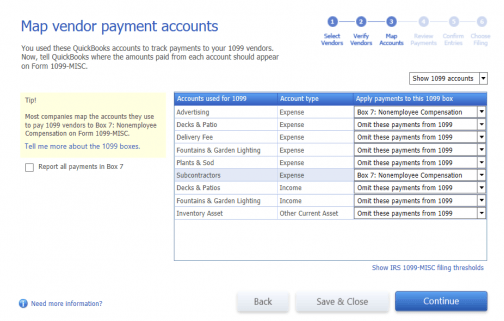
- Calculate Form 1099 Quickbooks MISC by mapping accounts to boxes.
- Once done, the QB 1099 Wizard will pop up listing the QB accounts which tracks all payments made to the 1099 vendors
- Now tap on “Add payments” or click on the “1099-MISC” box.
- The majority of vendors will be charged for Box 7: Non-employment Benefits, but you should consult a tax professional prior to choosing the box.
- Here, for every account, select a 1099-MISC box, you can click on “Skip these Payments” as well.
- After the accounts have been mapped, simply click “Save & Close”.
Basically, three name fields are features in QuickBooks Desktop:
- Company Name
- Vendor/Contractor Name
- Full Name
Possible Scenarios After Completing “1099-MISC Forms”
These are the most likely scenes, based on the information you enter in the form.
- Both the Company Name and Vendor Name have their own values in QB Desktop.
- Outcome: The 1099-MISC form will include both the Vendor Name & Company Name.
- Value For Company Name and Blank Vendor Name Value in QB Desktop.
- Outcome: The Vendor Name cannot be left blank. However, you have the option to enter the Vendor/Contractor Name and leave the Full Name blank. In such cases, the 1099-MISC Form will only show the Company Name.
- Blank Company Name and Values For Vendor Name in QB Desktop.
- Outcome: Only the Vendor Name will be included on the 1099-MISC form.
- Distinct Values For Company Name, Vendor Name, and Full Name in QB Desktop.
- Outcome: Only the Company Name and Full Name will be displayed on the 1099MISC Form. Sometimes, it can also show some Bank Feed Issues in QuickBooks.
How to Print 1099-int From QuickBooks Desktop?
Follow these steps for printing the IRS form 1099:
- Firstly, navigate to “Vendors”.
- Then choose “Print/E-file 1099s”.
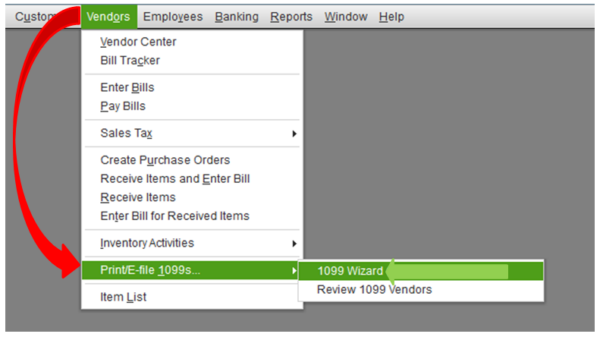
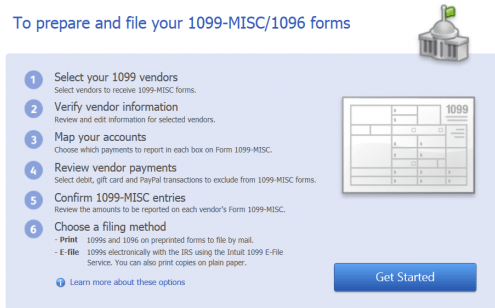
- Now tap on “1099 Wizard’” followed by clicking on “Get Started”.
- At step 6 of the wizard, select a filing method then tap on the Print My 1099 option. Thoroughly read the message there and tap “OK” for getting the print.
- Pick the data containing the paid 1099s data and hit “OK”.
- Then choose the Form 1099 Quickbooks that you want to print and click on “Print”.
- You can check the preview by tapping on “Preview” and then examine the alignment. Steps to align the form are:
- Firstly, tap on “File”.
- Then tap on “Printer Setup”.
- Thereafter close 1099s/1096 via “Form Name”.
- Tap on “Align” then adjust alignment.
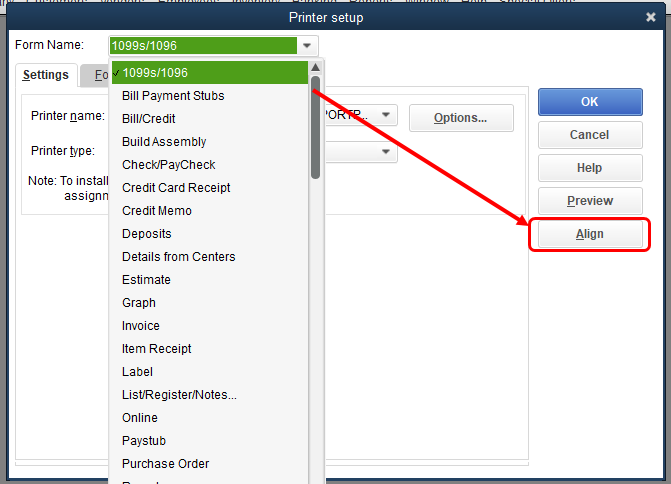
-
- Now click OK. Tap “OK” once again to save the changes.
- Select “1099(s)” that you want to print and tap on “Print 1099(s)”.
- Tap “Print 1096” to print 1096.
Pointers To Think Before QuickBooks 1099 form Printing Desktop
- Firstly, enter the state abbreviation with the postcode in the “Address” section.
- For an individual vendor, the supplier’s name must come in the first, middle, and family boxes.
- If you know the company name but not the individual’s name then leave the box of the company name empty.
- Tap on “Taxes Setup Link”.
- Choose a vendor which is successfully qualifying for QuickBooks 1099 form.
- Type the tax obligation ID number of the supplier under the “Vendor Tax ID” section. Then click “OK”.
- Follow steps 2-6 for other 1099-eligible vendors.
How do I Print 1099 Forms in QuickBooks for Mac?
- Firstly, open your Quickbooks account and create the 1099s.
- Thereafter select the method from the filing method window.
- Now tap on “Print 1099-NECs” or “Print 1099-MISCs”.
- Type the dates.
- Then, tap on “Select all Vendors” to print 1099s.
- Tap on the “Print 1099” option.
- Now, simply confirm your printer’s setting.
- In the end, click on “Print” to make a printable 1099 form and you are all set!
Print 1099 Forms in Intuit Online Payroll
1099s are tax forms that must be filed with IRS when contractors are paid in cash, deposit, or by check. Here a simple feature of Intuit helps you prepare your 1099s easily. Below are the steps to create 1099s for payroll objectives.
- Click on “Taxes and Forms” and select 1099. Then return to the 1099 service.
- Select “Enter Information” Then choose “Continue”.
- You will receive 1099-NEC pr 1099-MISC forms. To make any changes to the information or values of the contractor, click “Edit”. Make sure you take your time when choosing forms.
- Click “Print For Contractors” or “Print for your records”. Again, remember to mail the forms correctly.
- Tick the list of contractors you have paid in the last year. Then click “Continue”.
- Put your payment details by choosing a payment card. If the information is accurate, click “Approve”.
- Provide copies to your contractors.
How to Print 1099 from Quickbooks Online?
These steps will allow you to print the IRS Form 1099 Quickbooks easily.
- Navigate to the QuickBooks Online home screen.
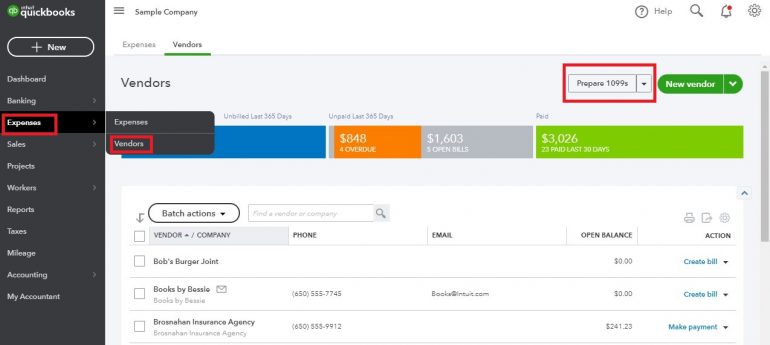
- Tap on “Expenses” at the left and click “Vendors”. Next, tap on “Prepare 1099s”.
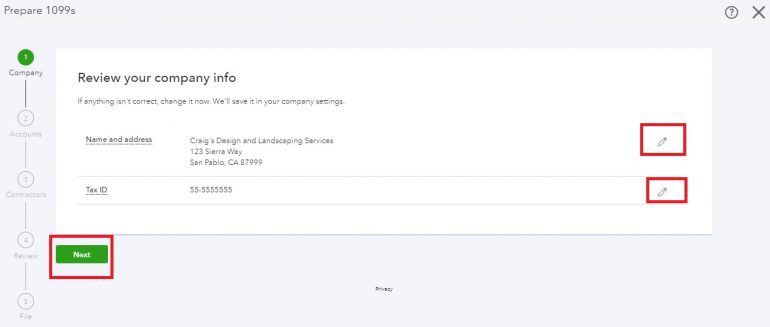
- Type your company information
- Enter information about your company: This includes the name of the company and its address. If you make any typo mistake then click on the “Pencil” icon. After making sure that all information is correct, click “Next”.
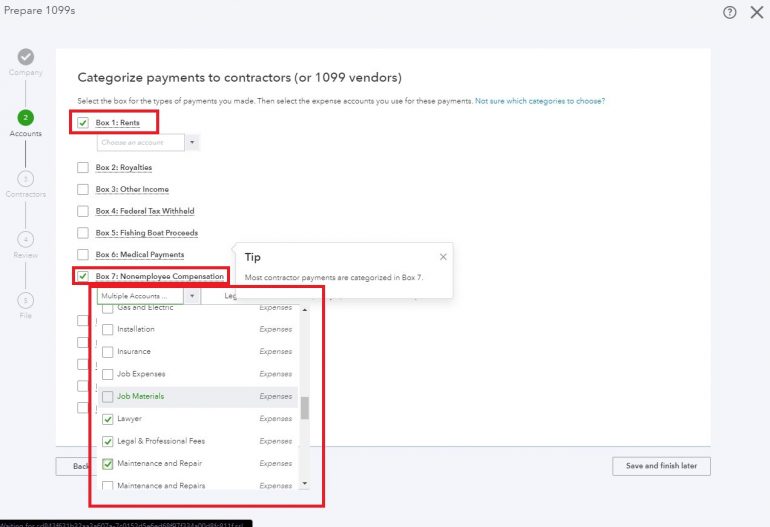
- Choose the Payment Type: Business owners generally choose between “Non-employee” and “Rent” compensation. You can select the option by checking the box beside it. After choosing all options, you’ll see a drop-down box where you have to choose the accounts from which you want to post payments in QBO. Select all accounts that are applicable (categories) and click on “Next”.
- Verify the Contractor Information: The next screen will display a vendors list that needs an IRS Form 1099. This list is based on information that you provided earlier on the Vendor screen. It is easy to add vendors to your contractor’s contact list. Just click on “Add from Vendors List” and select any vendors who require form 1099. Once you’re done, tap on “Save”.
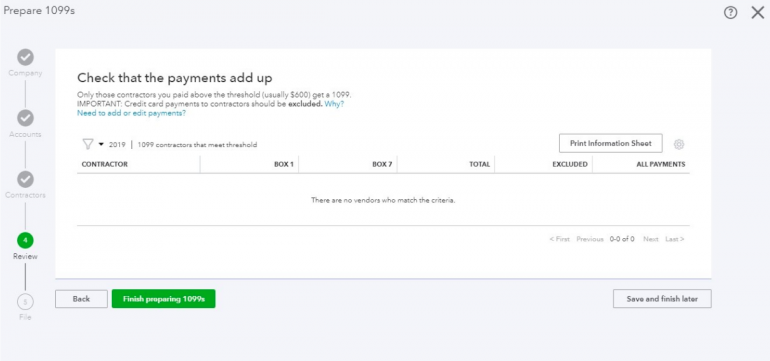
- Review Your Details: This is where you can find out any errors. You can also change the tax year in case you want to print 1099s for the last year or for contractors.
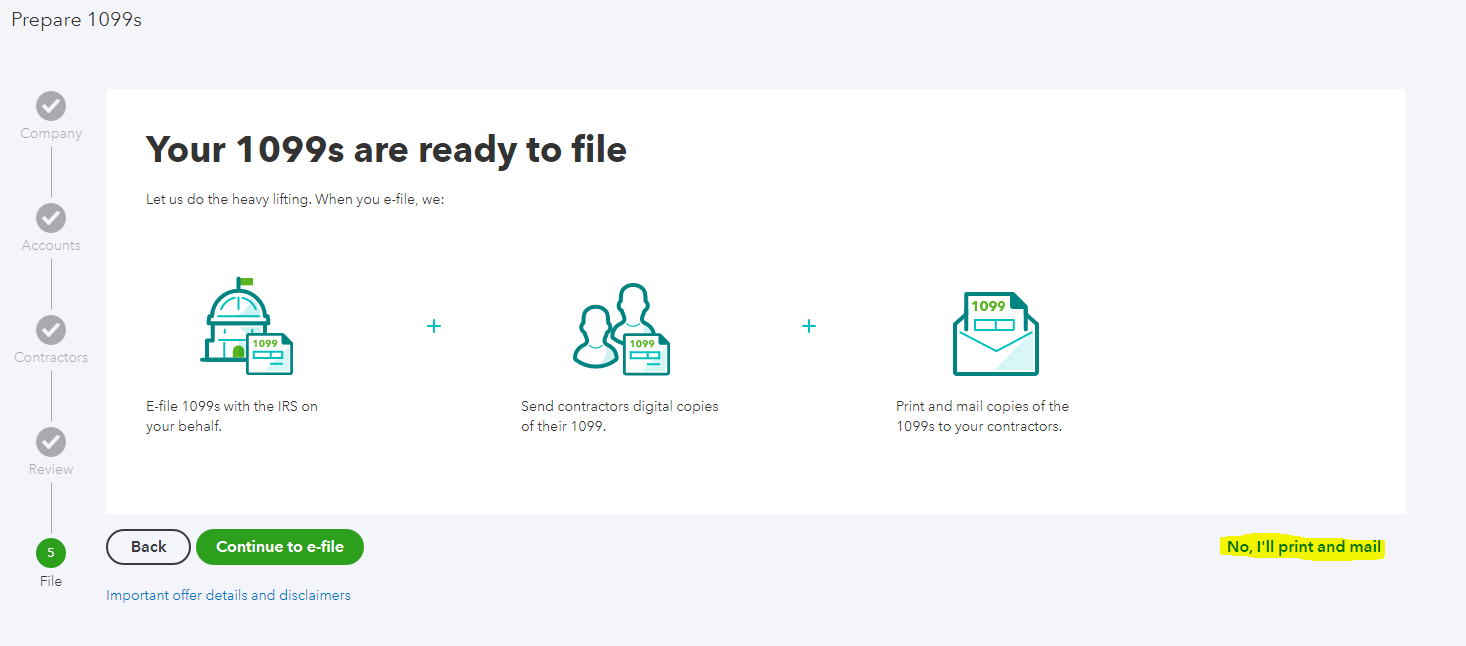
- File the Printable 1099 Form: After you’ve verified your details, you can move on to the final step. Here, you get the option to select “Automated Electronic File and Delivery”. Once you choose this option, Intuit handles all 1099 filings and delivery. You can review the data and modify any necessary changes. This saves you the hassle of mailing, printing, and filing 1099s manually. This is how to print 1099 int from QuickBooks easily.
Before you print 1099 from QuickBooks Online, these are some tips to help you:
- When you pay a vendor, be sure to obtain a W-9 form. The W-9 form should include a few details about the vendor like their name, address, and EIN.
- After receiving the Form W-9, make sure to enter vendor information in Quickbooks Online. You can avoid any last-minute rush if you have missed any information.
- You must enter the correct information about your vendors.
- To ensure that you are not missing any information, it is a good idea to do a regular routine check. Make sure you have the latest QuickBooks Payroll Updates Tax Table along with the latest software version. They are surely worth your time!
Frequently Asked Questions
Q1.What are some Crucial Points when Printing Forms 1099 in QuickBooks Desktop?
It is important to remember some aspects in mind while printing forms 1099 in Quickbooks, they are:
- Make individual copies with a page-oriented printer instead of printing them all at once.
- Pre-printed forms should not be collected before you print them. Load all of the Copy 1 forms first. Once all the Copy 1 forms for vendors have been printed, load the Copy 2 form and take your prints.
- Copy A will be sent to the IRS (non-perforated), and copy B will go to manufacturers and suppliers. Websites may only have two vendors.
- Then, you’ll be asked to choose -1 to place the print or +1 for Alignment.
- This option allows you to reduce or increase the print’s size by 1/100th inch.
Q2. What Modifications Can I Make in my 1099 Form after it has been submitted?
After submitting the form, All types of corrections you want are allowed. But you can make changes only if there’s a date scheduled for the future. Following are the 2 types of corrections:
Type 1 Correction
- An incorrect address was entered.
- Reporting the wrong Box number
- A wrong amount.
- Did not file 1099 for a recipient.
- You forgot to tick the correct box.
Type 2 Corrections
- Name combination changes.
- Incorrect Tax ID or Missing Tax ID
- Wrong tax year
- Wrong Recipient Name.
Q3. How Can I Verify the Status of My Tax Form Submission Without the Reference Numbers?
To verify the status of your tax form submission without any reference numbers, you need to:
- First, click on “Forms”.
- Then tap on “Manage Forms”.
- Choose the payer name after selecting the Tax year to view the form status.
- Under “Status”, you will see the following options:
- Pending: The IRS is waiting to receive your forms because they have future scheduled dates.
- Processing: The forms will be submitted to the IRS, which will review them, and if it’s correct, they will accept the forms.
- Accepted: The IRS has accepted your form.