Accounting software, such as QuickBooks Online, may help you better manage your money, whether you operate a growing business or are self-employed, by providing an easier guide to know “How to reconcile in QuickBooks“. Even small business accountants use QuickBooks Online’s automated reconciliation tool, which can reconcile your finances in minutes rather than hours.
In this article, we will understand the QuickBooks reconciliation and will gain insight into some of the few tips for the reconciliation process.
Table of Contents
What is Reconciliation?

If you work in company management or accounting, you’ve probably heard of reconciliation.
However, it is a standard accounting procedure that you may not completely comprehend or prioritize. This is frequently done at the end of a fiscal period to ensure that the quantity of money spent exactly matches what your accounts have at the end of the period.
Even little errors that go unnoticed can lead to serious concerns in your company’s financial statements, delays in invoicing or payments, and future accounting troubles. It also serves as a crucial verification that no fraud or unsavory actions are taking place.
In a nutshell, the process of checking that the balance in the accounting books matches the amount in the statement is referred to as reconciliation.
Within an organization, there are several types of accounts. However, it is crucial to reconcile the key accounts, which include:
- Accounts Payable
- Accounts Receivables
- Fixed assets
- Cash
- Investments
- Expenses that are prepaid
Quickbooks is accounting software used by small and medium-sized organizations. It is critical for every user to execute QuickBooks reconciliation in order to eliminate any conflicts.
Few Tips to Know “How to Reconcile in QuickBooks Desktop”

Before going further into the reconciliation process, first, let us go through a few reconciliation tips:
-
Look for Inconsistencies
To view the record, click the Discrepancy Record Button. This tool selects any rewritten or eliminated transactions that may have an impact on your QuickBooks reconciliation.
-
Check Your Balance.
Check that your starting balance is merely linked to your bank account, but if it isn’t, you should hit the Undo Last Reconciliation button right before expanding to a point where the starting amount matches your bank statement.
Also, note that you must restart the reconciliations to bring your books up to date and to correct the mismatch.
-
Check the Final Balance Twice
Ensure to double-tap your ending balance whenever you begin the reconciliation process. A minor blunder might cause you to miss a transaction. As a result, be cautious and double-check everything.
-
Transpositions
You may notice differences in your transactions once you designate them as deleted. In such a situation, the dissimilarity may split by 9. You can alter a number on a transaction if split off on an even plate.
-
Entering all Uncompleted Transactions
Add all of the missing and absent transactions without closing the previous reconciliation window. You may choose a command from the Home Screen, and then the stored transactions will appear in the QuickBooks reconcile window.
-
Old Transactions Must Stand Cancelled
Detect all past transactions on your register and modify them, as well as the Void. It is important to understand that outdated and uncleared transactions might cause significant delays.
You may like to Know:
-
Banking on the Internet
You may simplify your new transactions by using organizations that allow users to modify their records to their online statements. This approach provides a matching method that clears transactions and, as a result, simplifies your job.
-
More Frequently Reconcile
When you have online access to your bank account, it is evident that you may conduct QuickBooks bank reconciliation as often as you like. You can evaluate the worth of balancing accounts weekly or twice a month.
When and Why Should you Reconcile Your QuickBooks Online Accounts?
You should reconcile your bank accounts once a month, ideally around the time you receive your bank statement indicating that it is ready.
So QuickBooks Online matches what your bank or credit card company claims you have spent, and earned. The previous month’s ending balance should match the beginning balance of the following month. Also, your QuickBooks Online register balance at the end of the previous month should have been the same as the one on your bank statement.
Furthermore, your accountant is most often the one who performs your bank reconciliation in QuickBooks online.
If the chart of accounts is the foundation of accounting, and the bank feed is the foundation of QuickBooks Online, the bank reconciliation is the monthly climax of life within your financial data. Without a question, reports are vital, but bank reconciliation is critical to a healthy corporate existence.
How to Reconcile in QuickBooks Online?
Let’s understand how to reconcile in QuickBooks online. Follow the below-mentioned steps to reconcile in QuickBooks.
Step 1: Move Towards Reconcile Page
Here are two methods to reach the Reconcile page or module. You may either hit “Accounting” onto the side panel & then “Reconcile,” or you can hit the “Tools” & then “Reconcile” from the gear menu. Either choice will lead you to the same location.
Step 2: Choose an Account to Reconcile
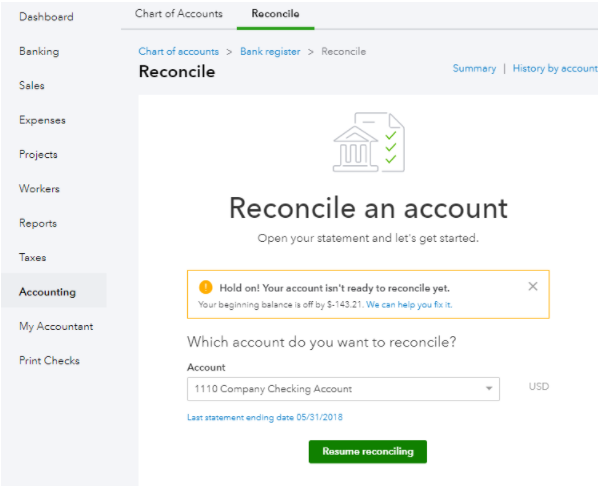
Select the account to reconcile from the drop-down menu after you’ve arrived at the Reconcile page.
Normally, you’d click “Reconcile”—or “Resume reconciling” if you’ve already begun the reconciliation—but we’re getting a warning saying our account isn’t ready to reconcile owing to an issue. There is also the opportunity to resolve this issue under “We can assist you in resolving it.”
In this situation, we have most certainly removed or modified a previously reconciled transaction, thus we must resolve it before we can reconcile the next month.
Here are a few frequent blunders that may wreak havoc with QuickBooks Online reconciliation (and result in a similar alert): modifying a transaction’s date, removing or voiding a previously reconciled transaction (such as a check or a bill), or altering the source account of a previously reconciled transaction All of these are things you should avoid doing.
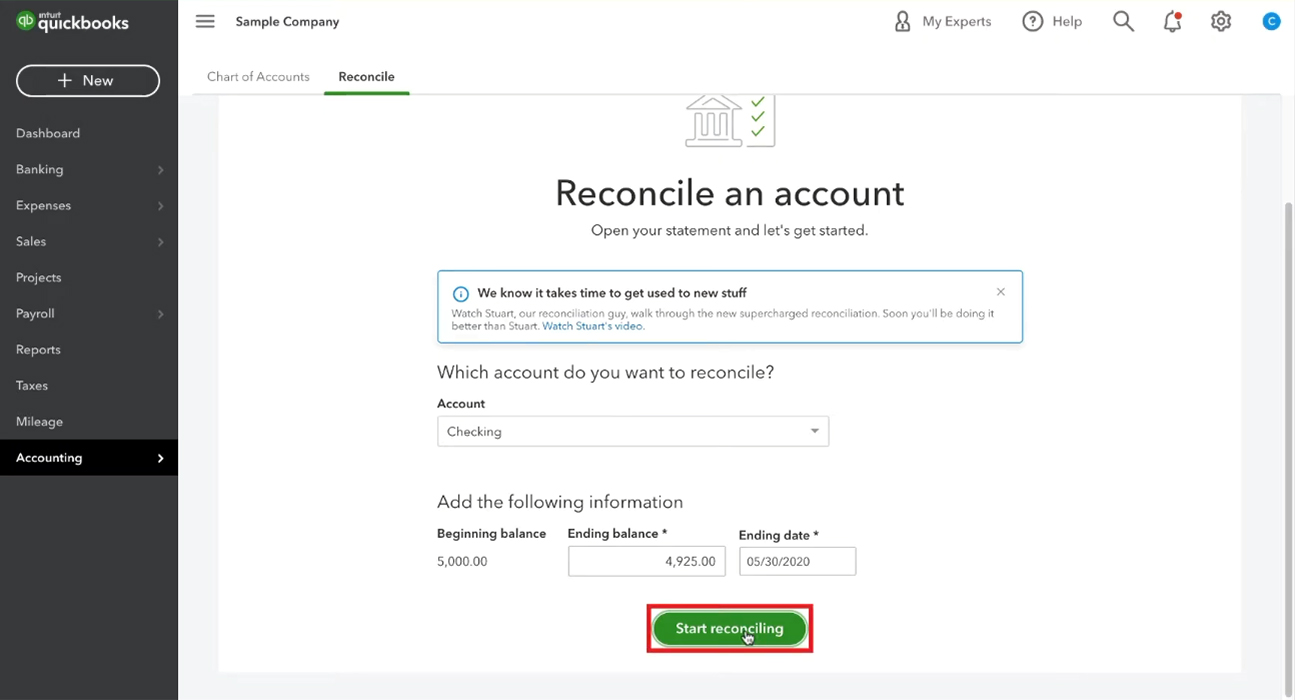
Step 3: Change the Statement Date
Find the statement date on your bank statement, it’s normally the final day of the month and is usually at the top of the statement. Then, in QuickBooks, input this date using the drop-down calendar.
Step 4: Check the Beginning Balance
Make sure the initial balance in QuickBooks desktop matches the beginning balance on your bank account.
Step 5: Fill in the Ending Balance
In QuickBooks, enter the closing balance from your bank statement.
Step 6: Click on Start Reconciling
After entering the necessary details, hit on Start Reconciling. Quickbooks reconciliation is efficient since the program can perform a lot of the work for you. However, it is still crucial that you enter all of the correct numbers and double-check every result displayed.
Step 7: Examine the Reconciliation Report
After QuickBooks has completed the reconciliation, you will receive a report containing a wealth of information. Let’s go over what you should be looking for in this report. On top of that, you’ll notice a summary of your starting and ending balances, payments, and deposits.
Then you’ll get a detailed breakdown of all transactions. Each transaction will include the date, the date it got cleared, the kind of transaction, a reference number if applicable, the account, and the payee. A green sign on the right indicates if the transaction indeed matched the banking stream. You will also see sections for payment or deposit, with the amount of the transaction indicated.
Step 8: Match Transactions
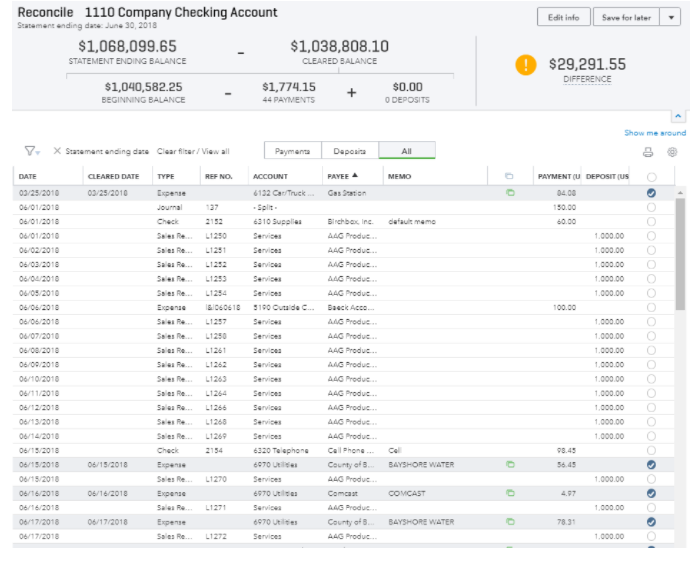
With your bank statement in hand, you may go through each transaction and confirm that they all match. When a transaction matches, you may check it off in Quickbooks’ furthest right column.
When you’ve ticked everything off, you should see 0$ in the upper right corner where it reads Difference. After that, simply click Finish now!
Following that, you may see and save the reconciliation report on its whole. It’s that simple for QuickBooks to reconcile, and it ensures that you don’t miss a single transaction or allow anything to fall through the gaps.
Read: What is Quickbooks Self Employed Version?
Step 9: Check the Information Twice
Now you need to check that all of the information appears to be right.
Step 10: Ascertain that the Difference is Zero

If you followed all of the steps successfully, the “Difference” at the bottom of the screen should be 0.00.
When the difference is inaccurate (even by a few pennies), double-check your QuickBooks transactions and bank statement for any inconsistencies.
Wrapping Up!
We believe this guide will assist you in QuickBooks reconciliation. Moreover, it’s advised to make a monthly routine of reconciling your bank accounts in QuickBooks Online. And it’s preferable to do it as soon as you get your bank statement.