You may know that there are a number of ways to Convert Xero to Quickbooks. The technique you desire to use totally depends on the version of Quickbooks you possess and the sort of business needs you have. It does not matter whether you are using the Xero application on an organizational level or a personal level. The steps of conversion that we are going to introduce to you are universal and up to the mark. We can say this with utter confidence because we ourselves have tried and tested it.
However, you will have to fetch a few tools to perform it easily and efficiently. So, without further ado let’s jump-start the process.
Table of Contents
What are the Criteria to Convert Xero to QuickBooks
These are the necessary criteria that are to be fulfilled.
- You should have US editions of QuickBooks, version 2007 or newer.
- Multicurrency should not be enabled. This means, only one currency is allowed.
- Data of the current fiscal year and the previous fiscal year has to be there in Quickbooks.
Precautions to be taken before converting Xero to Quickbooks
- Try to arrange the Quickbooks Data in an organized and elegant manner. Only keep the data that is required, clean out the rest.
- The maximum number of accounts in the chart of accounts should be 699 (this is including the inactive accounts).
- The Account numbers in QuickBooks get converted to account codes in Xero. This means Xero requires account codes, so you have to enable them.
- If any account is unnumbered, they will automatically be assigned a numbering during the conversion.
Visit to know, How to use Quickbooks Tool Hub effectively
Quickbooks File Specification
You have to save your file in QBB, QBW, or QBXML format to convert it easily from qbxml to qbw. Your file size should not be exceeding 1GB.
In case you are using QuickBooks Online, you will have to convert the file to QBXML format. A QBXML file can easily be transferred to your system before you select Convert Now to convert from QuickBooks Online to QuickBooks Desktop. If you by any chance are using QuickBooks Desktop for Mac, you will have to convert the file to Windows. In QuickBooks, simply choose File, then Back up to QuickBooks for Windows. It is just like Converting Peachtree to Quickbooks.
Upload the Quickbooks File in Xero
- First of all, you have to sign up for a Xero account.
- Now, simply add a brand new organization.
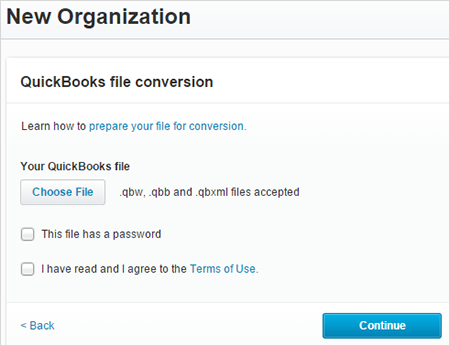
- Enter the name of your organization. Next, choose the country wherever the organization pays taxes. You will have to select the option called Want to convert your QuickBooks data for free?.
- Tick Yes, convert my QuickBooks data
- Click Continue.
- Click Choose File, then navigate to and choose the QuickBooks file saved on your system.
- Next, enter the file credentials.
- Carefully read the Terms of Use and tick the checkbox to confirm the same.
- Hit the Continue button. Your QuickBooks file will initiate to upload.
Track the Progress of Export Xero to Quickbooks
It is good for you to keep on checking the conversion process. If you notice any kind of abnormalities, it is recommended that you stop the process then and there. This is how you can do this.
- Initially, you have to click on the organization name. Choose My Xero.
- In the tab named Conversions, you can view the progress of your conversion.
- If you observe a conversion error, you have to click Fix errors. This will display the information regarding it.
Cease the QuickBooks to Xero conversion
- The very first step is to hit on the organization name, then choose My Xero.
- In Conversions, select Cancel conversion.
- Choose Cancel Conversion to confirm.
Also read, How to fix negative inventory in QuickBooks
Check the converted data
While you have completed your QuickBooks to Xero conversion, it is important that you just do not amend the Conversion Balances and Conversion Date.
Also, avoid removing any reinitiated transactions from your organization unless the Xero support team asks you to perform this. Changes to the present information will cause discrepancies in future reports and account balances.
Tally all Your Transaction Modes
You will have to reconcile transactions in Xero that were reconciled in QuickBooks
Find and Fix Unidentified Invoices and Bills
There are often instances when the converted invoices and bills lose certain information during the conversion process. At such times, the invoices and bills pop up under the contact name No Contact in Xero.
- In Xero, run the aged payables and aged receivables detail reports as at the tip of this month.
- If there are unit aged liabilities or aged assets for ‘No Contact’, then you may have to run a constant aged report in QuickBooks to check the information.
- Enter bills and invoices in Xero (so your aged liabilities and aged assets reports in Xero match your QuickBooks reports).
- Use the proper contact details.
- You have to date your invoices and bills that are used for the date before the conversion date.
- Code your invoices and bills to a clearing account.
- Create matching credit notes for ‘No Contact’. Code the credit notes to your clearing account to reverse the ‘No Contact’ balance. Add a credit note from a bill
- Add a credit note from the associate invoice.
- Run the Balance Sheet to check the clearing account balance is zero.
Check out, How to restore a portable file in QuickBooks
Finally, we have reached the end of this article. Hopefully, you could perform the conversion of Quickbooks to Xero using this post. If so, as a token of appreciation, check out other articles on our website. These articles will be more than enlightening to you. You can find almost everything related to Quickbooks on QB errors.

